Our External World - Indian Makeup Beauty Fashion Travel
Showing posts with label nail paint. Show all posts

Tuesday, February 19, 2013

Elle 18 Nail Pops Shade 53 - Review & Swatches

Was having a gloomy mood since a week but I knew something that would cheer me up. An instant mood uplift using the bright Elle 18 Nail Pops shade 53.
Elle 18 Nail Pops shade 53

Elle 18 Nail Pops shade 53

Elle 18 Nail Pops Shade 53

Elle 18 nail pops come in really cute small little bottles. The handle has this lady drawn on it which looks very attractive.
Elle 18 Nail Pops shade 53

The shade 53 is a gorgeous bright blue color with a tiny hint of green. It is absolutely lovely and really brightens up your hands (and your mood!)
Elle 18 Nail Pops shade 53

Monday, August 13, 2012

Silver rain on my nails - Nails of the Week

Hi Friends, I have finally reached 100 followers on GFC!!!!!

And to celebrate I decided to do my nails all sparkly this weekend. Here is the final look before we begin the tutorial

Silver Rain on my nails - Glitter Nails
Now for this simple nail art all you need is some silver glitter and a clear polish. I used the 'Clear Glass' nail paint from Lakme and Silver glitter from N.Nails. This glitter is micro small in size, it is really tiny and hence gives a very nice non-overdone sort of looks to the nails.

Monday, August 6, 2012

5 nail paints–nails of the week 7

What does a girl do when she has 5 brand new nail colors sitting in her closet? Well… she tries them all on at once – one nail paint per finger – 5 colours 5 nails perfect match isn’t it?

Yes this week I did not have the patience to do nail art or showcase only a single nail color on my nails. So, I took out the five new nail colors that were pleading me to try them out, and one by one, painted each nail in a different color! This is actually a good comparison of the pigmentation. As you will see I have applied only a single coat to each nail. Lets see which is the most pigmented of the lot.

5 different nail colors
5 different nail paints
The first one is called Tinted Red from Faces Canada – a deep highly pigmented bright red shade.

Monday, July 30, 2012

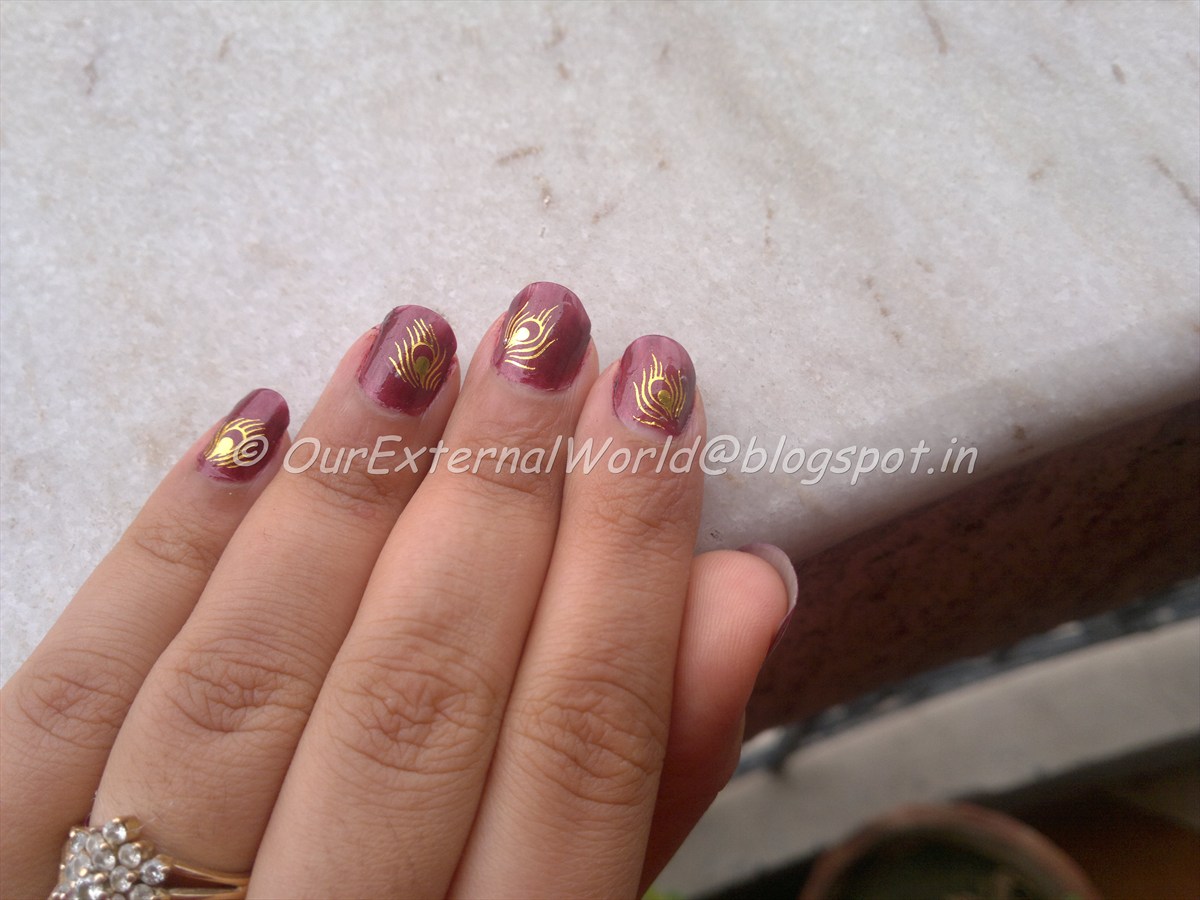
Bridal Nail Art - Gold Peacock Feathers Water Decal (NOTW 7)

I am super excited to share this week's NOTW!

This week I am sharing a nail art done using water decals. Water decals are designs that are created on very thin plastic sheets that can easily stick to your nail with the help of a top coat. These are called 'water' decals because in order to get the pattern you need to soak the pattern in water where it separates from the paper backing and can be picked up and stuck on your nail.

I got the Gold Peacock feather water decals from KKCeneterHK.com. One pack which has two different patterns for both hands costs around US$6.

And this is how it looks on my nails!
Bridal Nail Art - Gold Peacock Water Decals

Monday, July 23, 2012

Nails of the Week–5–Wet and Wild Misty Rose - Review


I had posted about the nail art stuff I got from KKCenterHK.com and I received one vote each for the Pussy Sticker, Peocock feather water decal, and Fimo. Since the request for Pussy Sticker came first (through face book) I will be doing a post on that sometime this week.

For the time being I’m going to share a nail paint from the Wet & Wild brand. The nail polish itself comes in a nice slim bottle with a good applicator.
Wet & Wild - Misty Rose


Sunday, July 15, 2012

Nails of the Week – 4 – NYC Big Money Frost (Review)

Normally I would wear only reds, pinks or nudes on my nails. But to brighten my mood I thought of doing something different. So this time I painted my nails GREEN!

Don’t you worry just yet, I did not paint a loud green but a rather neutral sort of green. Yes, I’m still not experimenting as much as I need to but this is just a start.
NYC - 118 Big Money Frost - on my nails
NYC - Big Money Frost - pale green nails
The shade that I am wearing is from NYC – its called Big Money Frost (green for money Open-mouthed smile) number 118

Monday, July 2, 2012

NOTW 2– Babys Breath on my nails!

Hi everyone, this week’s nails of the week look is simple and very easy to do. My inspiration this week were tiny white flowers called babys breath – these are usually added to bouquets as fillers.


PS: the picture of babys breath has been taken fromwww.flowers.vg (earlier picture was not showing up on some browsers so had to take it down)


I had freshly buffed my nails and they were looking pretty to me so I decided not to cover them completely with nail paint. And keeping my inspiration in mind this is what I did. You can click any picture to enlarge it.
2012-07-01-779
2012-07-01-7772012-07-01-781


First I painted the entire nail with a clear nail polish. Then I took a nail dotting tool (you can use a tooth pick) and dotted the pattern on. This time I took lots of pictures from different angles. As you can see I messed up the little finger but generally this nail art is very very easy to do.

Monday, June 25, 2012

NOTW 1 – Street Wear Snazzy

I love the posts that you all do – NOTD, LOTD, HOTD and MOTD. But when  I was a newbie to blogging it took me a little thinking to understand what all this was. So for those of you who are not familiar with these acronyms here is a break up of the terms.

NOTD – nails of the day
LOTD – look of the day
HOTD – hair of the day
MOTD – makeup of the day
OOTD – outfit of the day

I don’t change my nail polish too often (unless it chips off) so for me it will be Nails of the Week (NOTW). I will try and make this a weekly feature.
For the current week I’ve donned a metallic brown shade which I use often due to its neutral yet metallic look. The nail paint is from Street Wear and the shade is called Snazzy (15).
Now here are the pictures for you to see (first two are with flash – you can click on any picture to enlarge it)
NOTW 1 – Street Wear SnazzyNOTW 1 – Street Wear Snazzy

Monday, June 11, 2012

Butterfly Free Hand Nail Art - Tutorial

Linked@Lipgloss Linkup Party wants PINK and We Love Nails theme this week is free hand nail art. Well I thought this week I'm going to link both these up and present to you a butterfly nail art. Again as I've said in my earlier nail art tutorial - I like nail art that doesn't take too long to do. This week too I have really short nails and but the same nail art done on long nails would look lovely!
Butterfly nail art
Butterfly nail art
So without further ado lets begin.
First of course begin by painting your nails a base colour. I have painted it using Diana of London City Glamour - Jasmine. A nice pink colour as the base.

Next I took Sally Hansen Diamond Strength "Honeymoon Red" (I love that name) and draw short strokes to create the butterfly wings.

Then I took the Sally Hansen Diamond Strength "Save that Date" and drew the body and antennae for the butterfly.
Butterfly nail art
Butterfly nail art

To give this some shimmer instead of a top coat I finished with the Sally Hansen Diamond Strength Fairy nail paint.
Butterfly nail art
Butterfly nail art

Butterfly nail art
Butterfly nail art

Here is a step by step picture tutorial
Butterfly tutorial


Tuesday, May 29, 2012

Water Marbling Nail Art - Tutorial

Yes water marbling - can you believe it - a nail art technique using water! When I was browsing through the China Glaze website I saw this tutorial and it looked so awesome I just had to give it a try.
Here is a picture taken from the web showing a neat and clean version of the water marbling nail art.
Picture courtesy: www.makeuptalk.com
So even though my first attempt results are not that awesome I will surely share the step by step tutorial on how to do this sort of nail art.
Water Marbling
Water Marbling - finished result
What all you will need -
1. A small bowl of water (water should be at room temperature - this is very important)
2. Your favourite nail paints (at least two different colours)
3. A toothpick or some thin stick (preferably wooden)
4. Nail polish remover
5. Ear buds
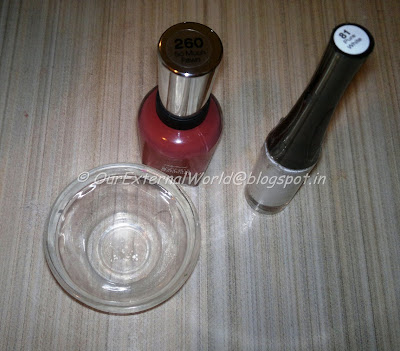
Water Marbling
Water Marbling
So here we go. Start off by putting some water in a bowl. Make sure the water is at room temperature.

Now take a nail paint, dip the brush in the nail paint and don't wipe off any extra. Put a drop of the nail paint in the centre of the bowl of water. It will slowly start to smear on top of the water.
Water Marbling - step 1
Water Marbling - STEP 1
Repeat this with the next colour putting the drop in the middle of the existing drop of colour. Keep repeating this till you have concentric circles of different colours. You can create any combination of colours depending upon your imagination. I played it safe with only coral and white nail paint. And as you will notice my design ended up towards one edge of the bowl and was in no way circular!
Nail paint tends to dry fast on the surface of water so think of your design before hand and do the  above step very very quickly.
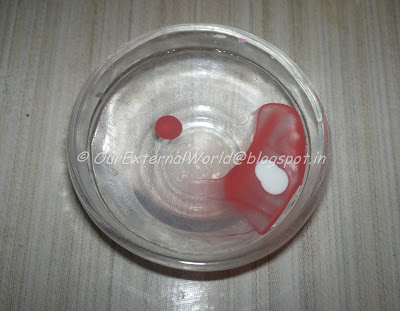
Water Marbling - step 2
Water Marbling - STEP 2
Nail paint will settle in the form of a light skin on top of the water. Now take the tip of the tooth pick and gently pull the colour in any direction. From the centre towards the edge of the bowl gives a nice pattern.
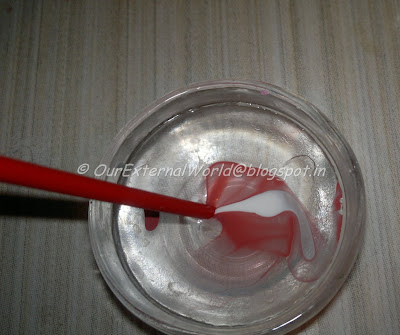
Water Marbling - step 3
Water Marbling - STEP 3
Don't pull too hard or you'll end up with all the nail paint on the toothpick itself. Once you have created some pattern using the toothpick, gently dip your finger (nail side down) onto the surface of water with the nail paint. The skin of the nail paint on the water will stick to your nail and also to your finger. Use the toothpick to steer unwanted nail paint away from your finger. Look in the image how the stretchy surface is seen on the water - that is the nail paint skin trying to stick to my finger nail.
Water Marbling - step 4
Water Marbling - STEP 4
One nail is done. To repeat on the other nails clear the water and start over. Once you are done with all the nails you will have something looking like the  picture below - notice all the extra nail paint on my fingers!
Water Marbling - step 5
Water Marbling - almost done!
Once the nail paint is dry (its almost dry when you take out your finger) take an ear bud dipped in nail polish remover and clean out the mess around your nails. Finally you should have something looking like this:
Water Marbling - final
Water Marbling - done!
I am surely going to try this again making a more predictable pattern in water. I did not create concentric circles hence my design is totally asymmetrical.

Hope you enjoyed reading this and will give it a try. It was real fun for me and the finish comes out nice and smooth. With practise better clean designs are very much possible!

style tip: stick cello-tape around your nails and on the fingers before dipping in the water. This way you will prevent the extra nail paint from sticking to your fingers

Sunday, May 27, 2012

Sally Hansen Diamond Strength No Chip Nail Colour - Fairy Tale Ivory - Review

Sally Hansen nail paints are really becoming my favourite. The nail paint I am reviewing today is from their Diamond Strength range.
The nail paints from the diamond strength range are no chip nail paints. The colour lasts on your nails for a very long time - it does not chip at all. Even after a week of having this on my nails it only fades off - never chips not even at the edges!

The nail polish comes in a glass bottle with a very cute little diamond stud on it (click on the pic to enlarge it and you will see the shiny diamond stud)
Sally Hansen Diamond Strength
The back label contains details about the nail paint and ingredients - I couldn't capture the back label properly as the shimmer particles would cause the light to reflect off and not give a clean shot.

Sally Hansen Diamond Strength
Sally Hansen Diamond Strength - back label
The shade I have is 02 Fairy Tale Ivory. Its a very pale pink colour with loads of shimmer particles. One coat only leaves the shimmer on your nails and two coats give you the nice soft pink colour to the nails. Nails appear healthier after applying this nail paint. I love how naturally shimmery my nails look after applying Fairy Tale Ivory.
Sally Hansen Diamond Strength - swatch
Sally Hansen Diamond Strength - sparkly nails
Sally Hansen Diamond Strength
I simply love the shade and the longevity of this nail paint. I do want to try out other shades from this range because nothing has lasted longer on my nails as much as the Sally Hansen Diamond Strength.

Details at a glance:
Packaging       : glass bottle with plastic cap - and a diamond stud on the front
Pigmentation  : good
Fragrance       : none
Staying power: long lasting
Price              : Rs. 500 (approx)

What I like:
1. The colour
2. Sparkly Finish
3. No chip - long lasting

What I don't like:
1. Nothing

style tip: apply a thin layer of this nail paint on your other nail polishes as a shimmery top coat - your nail paint will last longer and you can change the shade of your nail paints with the soft pink tinge in this nail paint.

Tuesday, May 22, 2012

Maybelline Colorama - dusky - review

It was a tough day today - loads of work and a lot of multi-tasking. My brain is tired of the overwork!

To ease the brain off I decided to paint my nails - a soothing colour - do you also feel relaxed when you are painting your nails or is it just me going bonkers over something as trivial as applying nail polish?

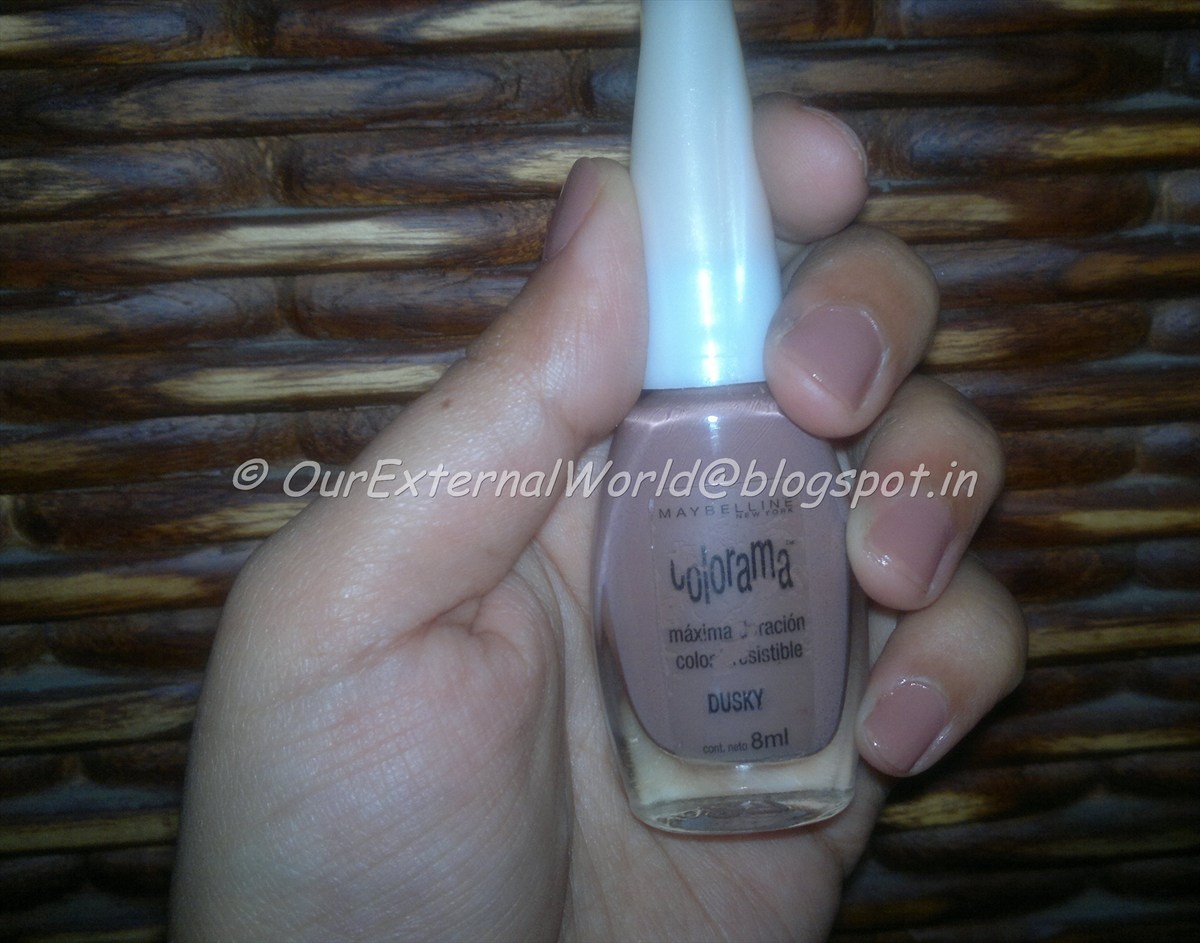
OK now to get to the nail paint - today I applied one of my favourite shades from the Maybelline Colorama range. The shade is called 'dusky' and as the name suggests its a dusky fawn colour that looks very natural and soft on the nails.

One coat can be used but won't last too long (and will fade easily specially near the edges)
Maybelline Colorama - Dusky
Maybelline Colorama - Dusky - single coat
Two coats give the lovely colour to the nails. The company actually claims that this is a 5-day wear nail paint but if you use your hands a lot this won't last long unless you have a top coat. The paint does have a nice glossy finish. The applicator of this nail polish is easy to use and gives a smooth coat of the nail paint.
Maybelline Colorama - Dusky
Maybelline Colorama - Dusky - two coats
Maybelline Colorama - Dusky
 And the final look -
Maybelline Colorama - Dusky
Maybelline Colorama - Dusky - Final look
Details at a glance:
Packaging       : glass bottle with plastic cap 
Pigmentation  : good
Fragrance       : none
Staying power: fades off easily without a top coat
Price              : Rs. 85

What I like:
1. The colour
2. Glossy Finish

What I don't like:
1. Nothing

Tuesday, May 15, 2012

Octopus nail art - tutorial

A friend on style craze did this really cute animal nail art with a hippo - I was inspired and thought of giving something in the animal theme a try. After a lot of thought I decided to try an octopus. I wanted to make mine really cute but well, ahmm... this is how it turned out

nail art - octopus

Here are step by step pictures - please ignore the horrible control on the brush - ya I tried doing this with a painting brush - which I realized is wonderful for paints but not for polishes! Keep reading because I do have a picture tutorial - and I'm sure those of you who are more practised with nail art can do a great job on this same little octopus!
nail art - octopus - nail paints used
Octopus Nail Art - Nail Polishes used
 Step 1: I took a paint pallet and mixed the Lotus white nail paint with NYC blue nail paint to create a light blue (for the ocean) colour - and then sponged it on using the same technique I used for step 1 of sponging-nail-art-soft-pink-tutorial
Octopus Nail Art - Step 1
Step 2: I used the Sally Hansen Salon nail paint and drew round circles in the middle of the nails using a 0 number paint brush (round nail art tools can be used for a smoother circle)

Octupus Nail Art - step 2
Octopus Nail Art - step 2
 Step 3: Next I took a toothpick - broke its tip and used it to draw the wavy legs of the Octopus
Octupus Nail Art - step 3
Octopus Nail Art - step 3
 Step 4 and Step 5 - I took the Sally Hansen Diamond Strength to add two dots for the eyes and then the white nail paint to draw the smile
Octupus Nail Art - step 4
Octopus Nail Art - step 4
And finally the tutorial on how to do it yourself:
Octopus Nail Art - tutorial
Octopus Nail Art - Tutorial
Nail paints used:
1. Lotus Herbals Color Dew Pure White (81)
2. NYC - In a Minute - shade 206 East Village
3. Sally Hansen - Complete Salon Manicure - shade 260 So Much Fawn
4. Sally Hansen Diamond Strength - shade 28 Save the Date

I hope you like the tutorial despite my horrible attempt. I wish I was more patient! Do share your trials if you do an Octopus :)

Wednesday, May 9, 2012

Simple rose nail art - with picture tutorial

After my stint with sponging I was waiting to get some time to try out nail painting with toothpick designs. I have been busy lately so finally today when I got 10 minutes free this is what I did

rose nail art

This isn't a very elaborate piece of work - and as I said I finished this in 10 minutes (yes I know its not all that neat but in the time I had this is the best I could manage)

First I will simply describe what I did - just look at the pictures - and at the end I will show you steps pictorially so that it is clear how to do the whole thing. (All pictures can be enlarged when you click on them)

The base of the nail is first covered in Diana of London Jasmine nail paint that I reviewed
here - Diana Of Londone City of Glamour - Jasmine

After that I draw small arcs using Lotus Herbals Color Dew nail enamel in Peach Perfect.
Use a toothpick to make the arcs.

I kept repeating the arcs until the flower was big enough for each nail. And finally I drew some leaves using simple arcs again. For the leaves I used a shimmery nail paint in green - NYC Big Money Front

And that's it - I was done.
And now for the steps - look at the picture I created using paint brush - it gives every step that you need to follow - simple arcs and you are done
simple rose nail art tutorial
Nail paints used:
1.  Diana Of Londone City of Glamour - Jasmine
2. Lotus Herbals Color Dew Peach Perfect
3. NYC Big Money Frost
4. Top coat - Lakme clear glass

I will try this again sometime later when I have a bit more time so that I can do it neatly. But I do hope you like the picture tutorial and can use this sometime. I have small nails but if you have bigger nails you can repeat the flower on your nails and can even try different coloured flowers. I have used the pointed end of the toothpick to pick up the nail color - you can use the flat end to draw thicker petals. You can also do the same piece of art using nail art tools.

I selected this post to be featured on Make Up Blogs. Please visit the site and vote for my blog!

linkwithin