Our External World - Indian Makeup Beauty Fashion Travel
Showing posts with label china glaze. Show all posts

Tuesday, April 1, 2014

Welcome Back Summers - Chevron And Lines Nail Art Tutorial

Today I'm sharing a nail art which I've done to welcome summers as part of the STNChallenge. This nail art is also part of my Illchallenge where the theme is chevron and lines. Yes here I go again trying to do two things in one go.

Welcome Back Summers - Chevron And Lines Nail Art
Please excuse my super dry cuticles - they aren't dry in person but don't know why they look like this in the pictures :(

I've chosen lovely pink colors because summers are the time when all my lovely pink dresses come out of the closet. The base is Diana of London Nail Paint shade City Glamor (check the link for proper swatches), then I used China Glaze Fifth Avenue for the inner chevron and Lakme Lavender Lush for the outer chevron and ring finger. Flowers are done using Lavender Lush and everything white and green is acrylics.
Welcome Back Summers - Chevron And Lines Nail Art

And to add to the summer feel I've added tiny flowers on two nails. This time I've done a tutorial as well so I hope you all enjoy it.

Saturday, October 12, 2013

China Glaze Fifth Avenue - Swatches & Quick Review

Today I'm sharing another nail polish from China Glaze which I love - China Glaze Fifth Avenue - shade 194. Its a pretty pink shade with a soft brown undertone. It is a sophisticated looking color that can be used by all ages and on all skin tones.
China Glaze Fifth Avenue - Swatches
The polish has a creamy satin finish. I love these finishes. It is highly pigmented and two coats give a completely opaque satin finish. These are currently retailing online in India for Rs 500.

Sunday, September 1, 2013

China Glaze Magnetix - You Move Me

This is a picture heavy post because when I started taking pictures of this I just had to take so many shots of the magnet in action. A video would have been better but I'm not planning on venturing into the world of videos just yet. That's a whole different world and I'll need an extra few hours in my day to get something like that done.

China Glaze Magnetix -  You Move Me
China Glaze Magnetix -  You Move Me
So now coming back to the post - today I am reviewing a magnetic nail polish by China Glaze. First of all for all of you who are not familiar with magnetic polishes I'd like to tell you that these polishes have very fine iron particles in them. Since iron gets attracted to magnets, when you bring a magnet close to your wet nails, the iron particles get attracted to the magnet forming different patterns on the nails. Once dry these patterns form your nail art.

Friday, August 30, 2013

Saran Wrap Nail Art - Simple Steps To Unique Designs

Today I'm sharing a simple nail art that I did quite a while back. Here I have tried the 'saran' nail art technique.

Saran Wrap Nail Art Tutorial
Saran nail art is a neat nail art technique that anybody can do, even beginners. All you need are two nail paints and some saran wrap (cling film from the kitchen or even bubble wrap sheets which has worn out)

Saran Wrap Nail Art Tutorial

Here are the steps for this saran nail art:

1. Paint your nails with the base color. Here I have used an onion shade for the base. Let the base dry completely.

Friday, August 16, 2013

Some Teal For Your Nails - China Glaze Exotic Encounters - Review and Swatches

Hi everyone, after my love for the China Glaze Chocodisiac I fell in love with a gorgeous teal colored nail paint from China Glaze. This one is called Exotic Encounters. 
China Glaze Exotic Encounters - Review and Swatches
The nail polish goes on opaque in two coats. There is no chipping even after one week. There is slight fading at the nail tips after about 5 days.

Monday, July 29, 2013

Nail Art Inspired By A Kurti - Brown and Purple Dazzle

Here is a nail art I tried taking inspiration from the pattern on my kurti. It has a brown base with a small white pattern and a hint of purple thrown in.
Nail Art Inspired By A Kurti - Brown and Purple Dazzle


For this I used China Glaze Chocodisiac reviewed HERE, a white nail paint from Lotus Herbals color dew range, Orly nail artist in purple (will review this soon) and a top coat from Essie.

To create the pattern I used the nail artist from orly for the purple lines and the nail art dotting tool for the white pattern. 
Nail Art Inspired By A Kurti - Brown and Purple Dazzle
Here are some more pictures of the nail art.

Saturday, July 13, 2013

China Glaze - Chocodisiac Swatches

Here are swatches of a lovely chocolate colored nail paint from China Glaze. I always wondered why I should spend so much on a nail paint but now I know. After Sally Hansen this is the second nail paint that has given me an exceptionally smooth application and a long staying power. A single coat lasted an entire week with a top coat with no chipping at all.

China Glaze Chocodisiac


Now for the swatches, pictures will speak for all the missing words - enjoy!

China Glaze - Chocodisiac - swatches
China Glaze - Chocodisiac

Wednesday, July 10, 2013

China Glaze, Essie, Orly and Some Hair Care Haul

This is one haul that I was eagerly awaiting and longing for. I really wanted to try out China Glaze but wasn't sure if I wanted to spend so much on a nail paint. And then I saw some extremely good swatches of Essie nail polishes which are not even available here. And so my search began online.

I found a website Beauty Stop Online that was offering free shipping* over $59 or a flat rate of $8.99 if the order value was less than $59. I don't like paying for shipping so I actually made sure my cart total was $59. You can pay using your credit card easily.
Beauty Stop Online
Beauty Stop Online
Their shipping rules are clearly mentioned on the site
Beauty Stop Online - Shipping


Thursday, April 4, 2013

My Little Pony Rainbow Dash Nail Art Tutorial

Guest post by Nicky 
Nicky loves to do nail art and does an extremely good job of it! She sportingly agreed to do a post for OurExternalWorld where-in she has shared a lovely nail art that reminds me of Rainbow Dash from the My Little Pony collection - one of my childhood favourites! Nicky this is what I have named your nail art.

My Little Pony Rainbox Dash Nail Art

My Little Pony Rainbox Dash Nail Art
To achieve this look you will need 
1) 4 bright nail paints,
2) White nail paint
3) Black nail paint
4) Stamping plates (used here W111 and W117 from Winstonia)
5) Stamper
6) Sponge (makeup sponge works best)
7) Base coat
8) Top coat
9) Transparent shimmery nail paint like fairydust from China Glaze (optional)
My Little Pony Rainbox Dash Nail Art

My Little Pony Rainbox Dash Nail Art

Collect everything before you begin!

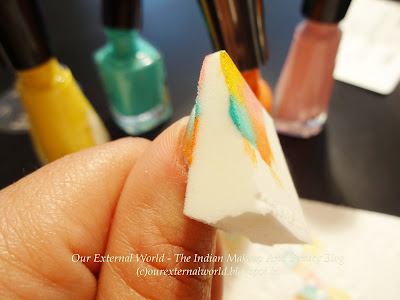
First apply the base coat of your choice and let it dry completely. Then take a sponge, here I used a makeup sponge. Regular sponge from kitchen could also be used to do this manicure. But the smoothness in blending colors could be different.

Now apply a base color and I used plain white. After that apply your choice of four bright colors on the sponge, here I have used orange, red, yellow and blue. Depending on your nail size you could use as little as two colors to achieve the same look.

My Little Pony Rainbox Dash Nail Art
Now dab that sponge lightly on a paper towel once and then dab it on your nail and keep dabbing lightly moving in an up and down fashion covering the entire nail. You can repeat this step as many times as you need to. Just make sure each layer is completely dry before sponging again otherwise you will start smudging the bottom layers and ruin the whole thing.
My Little Pony Rainbox Dash Nail Art

After that I added a coat of fairydust from china glaze but this is optional. This just adds some nice soft shimmer to the finished look. Sponging will make the nail little bumpy but applying top coat will smooth out the whole thing and will blend the colors better.

My Little Pony Rainbox Dash Nail Art


After this I cleaned up the cuticles and then stamped the images on the nails..

My Little Pony Rainbox Dash Nail Art


First stamp all the nails with the rainbow pattern using a white nail paint. Then once it dries off stamp the accent nail with the image of a horse.

My Little Pony Rainbox Dash Nail Art
Hope you all liked it.

About the author: I am Nicky. Currently taking care of my 3 year old son. In May 2012, I discovered a new hobby of nail stamping. Still trying to learn many new things. You can check out more of my work on my facebook account.         

Thank you so much Nicky for sharing this awesome nail art! Girls please leave your comments for Nicky in the comment section below. Lets tell her what a lovely piece of work this is!


linkwithin