Our External World - Indian Makeup Beauty Fashion Travel
Showing posts with label how to. Show all posts

Saturday, February 4, 2017

How To Do A Facial At Home Using Inveda Facial Kits


How To Do A Facial At Home Using Inveda Facial Kits

A facial is very relaxing when done at the parlour by a trained professional. But for women like me who are always short on time for self pampering, INVEDA has launched easy to use home facial kits.

Last year when I was traveling to the US and wanted something that I could take with me for an instant lift me up for my skin, I took along two variants - The Argan Oil & Dragon Fruit facial kit, and the passion fruit and silk protein facial kit.

Ingredients of Inveda Facial Kits


These INVEDA facial kits include ingredients like Passion Fruit Oil which protects from damange caused by free radicals, argan oil, panax ginseng extract which improve complexion, ashwagandha extract that prevents fine lines and works against blemishes; Vitamin C known for its action against hyperpigmentation; Vitamin B3 - a very common ingredient in skin care treatments, dragan fruit extract to fight signs of aging etc.

Each kit is priced at Rs 225

Both the kits are very similar and I'll be using pictures of the Passion Fruit & Silk Protein facial kit for this review.

INVEDA facial kits come in a small box with 5 sachets each. This is a one time use facial kit consisting of a cleansing cream, a face scrub, a massage cream, a face pack and a protective serum.

Friday, October 9, 2015

How To Use A Fabric Shaver On Delicate Clothes

A fabric shaver is a nifty little device that helps you remove lint from your clothes. Lint is normally seen on woollens and while we are still far away from winters, you might notice lint on certain other fabrics as well. A fabric shaver basically shaves off the lint and fabric pills from your clothes. It is important to note that a fabric shaver must be gentle enough to only shave off the lint without damaging the cloth.

There are lots of fabric shavers available in the market. I have one from  Philips which I will be showing you as I tell you how to use a fabric shaver on delicate clothes.

How To Use A Fabric Shaver On Delicate Clothes, Indian Fashion Blog, Indian Beauty Blog, Philips India
How To Use A Fabric Shaver On Delicate Clothes

The Philips fabric shaver is a cute little device in pink and purple. It comes with two batteries, a shaver protecting cap and a cleaning brush. There are no cords and it is light weight which means you can plop it in your bag wherever you go.


The fabric shaver houses a little compartment where all the lint gets accumulated. Once full you can simply slide it off, dust the lint out and reinsert it into its slot.

The fabric shaver has a large head so you can cover more area of the fabric in one go.

Once you have assembled your fabric shaver, inserted the batteries, then you follow these simple steps.

Tuesday, July 28, 2015

10 Hand Soak Recipes To Keep You Nails Healthy

*Guest Post By Melisa

It is not a secret that every girl wants to look like a beauty queen. However, do you know how hard it is to keep all the rules and stay the prettiest person in the world? When we see such a beauty, the first thing that catches the eye is the girl's hands, especially her nails. It immediately gives us the impression of who is standing in front of us. For example, if a girl has untidy and un kept nails, then most people will stay away.

What makes the slovenly nail appearance? It includes dirt under the nails, stubby edges, different nail length, humpback, thin and weak nails. All these problems are easy to fix if you take care of your nails regularly. In other words, you just need to maintain its health. Although restoring the beauty of the nails is quite easy,  it takes a lot of time (the whole fingernail requires up to three months or even more to re-grow completely).

There are plenty of simple methods to keep your nails healthy. Here you will find a short list of the existing common methods to strengthen the nail plate:
10 Hand Soak Recipes To Keep You Nails Healthy

Monday, April 27, 2015

Nail Art Using Nail Vinyls - Whats Up Nails

Hello everyone! Before I tell you about nail vinyls I have a small update, the winner of Uber Chic beauty plates has been declared on instagram. AND, there is another instagram giveaway where one person can win $15 of products of their own choice from Bornprettystore.com - so head on over to www.instagram.com/OurExternalWorld

Now here we go, so first what are nail vinyls? Nail vinyls are like stickers that act as stencils on your nails to help create patterns. I used nail vinyls from Whats Up Nail Art Store. 

Nail Art Using Nail Vinyls - Whats Up Nails, how to, tutorial
Nail Art Using Nail Vinyls - Whats Up Nails

How To Use Nail Vinyls


The steps to follow when doing nail art using vinyls are as follows:
  1. Apply a base polish color (or clear polish) and let it dry completely.
  2. Using a plucker pick out the nail vinyl design you want and place it on the nail gently pressing it down evenly.
  3. Make sure the nail vinyl is securely placed specially if the design is such that it overlaps your nail bed edges.
  4. Now apply the next coat of polish - try picking a distinctly contrasting color. If the polish is pale then quickly apply multiple coats of the polish. The polish is to be applied over the nail art vinyl.
  5. Before the polish dries out use the plucker remove the nail vinyl following the opposite direction in which you applied the nail vinyl. This is very important if you have applied multiple vinyls to create some pattern.
  6. Now top off with clear polish and you are done!


I tried out the V-shaped vinyls called Chevron tips (and placed them straight) to create the first nail art that you see in the image below. For the second image I used the thin zig-zag pattern vinyl to create a lightening effect. The third and forth nail art was created using the moroccan nail art stickers.

Whats Up Nail art store nail vinyls are very easy to use. The vinyls come off easily without pulling off the base polish. If its your first time with vinyls stick to simpler patterns.

Nail Art Using Nail Vinyls - Whats Up Nails, tutorial, how to
Nail Art Using Nail Vinyls - Whats Up Nails

And here is a closer look at the different nail art vinyls that I have.

Monday, April 20, 2015

HPB Presents - Rainy Sky Using Pond Mani Technique (With Tutorial)

Hobby Polish Bloggers group is doing the theme of April Showers this month. I have been wanting to try out the Pond Mani nail art technique for quite sometime so I thought why not use that technique for this challenge.

This is what I came up with.
#HPBAprilShowers - Rainy Sky Using Pond Mani Technique (With Tutorial)

Pond Mani technique basically involves the use of a sheer polish. You apply the sheer polish then you  do some nail art on it. This is followed by another few layers of the sheer polish. You repeat this process until you get the desired effect.

Things that I used are Aquarelle Tints No 10 from El Corazon, Silver Foil Polish Kaleidoscope from El Corazon (for the rain) and What's Up Nails nail vinyls.
#HPBAprilShowers - Rainy Sky Using Pond Mani Technique (With Tutorial), whats up nails, el corazon, aquarelle tints, nail vinyls
#HPBAprilShowers - Rainy Sky Using Pond Mani Technique (With Tutorial)


Here is a step by step tutorial on how I achieved this nail art. I tried to capture the pictures at each stage. For the rain I used the dry brush technique using the silver polish. For every layer of dry brush 'rain' I coated with two layers of the sheer polish. On the accent nail I tried to create something like lightening using the nail vinyls.

Saturday, April 4, 2015

El Corazon Aquarelle Tints + Stamping Polish Review, Nail Art

El Corazon Aquarelle Tints + Stamping Polish Review, Nail Art, how to lead light technique, orange fruit nail art
El Corazon Aquarelle Tints + Stamping Polish Review, Nail Art

Last year around this time I had done a nail art inspired by mangoes - my favorite summer fruit. This summers I wanted to try out oranges - inspired not really by the fruit but the El Corazon Aquarelle Tints!

Aquarelle Tints are pale polishes which have an almost jelly like effect on your nails. You can build the color with multiple coats without making it look gloopy. The polishes are great for doing nail art called Leadlight Technique (which I have used on my thumb and middle finger.
El Corazon Aquarelle Tints 04, 06 and St-02 White Stamping Polish, lead light technique, nail art, review, how to
El Corazon Aquarelle Tints 04, 06 and St-02 White Stamping Polish

For lead light technique you stamp an image on your nail and then fill it in with colors. To do this nail art I first did 2 coats of the Aquarelle Tints shade 04 and 06 alternately on my nail. 04 is yellow while 06 is a pink color. Together they gave me the perfect juicy orange color that I wanted. 

Then I used El Corazon white stamping polish to stamp the image of oranges from a stamping plate BM 308. Then I took a few drops of Aquerelle Tint 04 and mixed it with a few drops of Aquerelle Tint 06 on a piece of paper and quickly applied the polish mix to fill in the orange. I kept applying multiple coats of the polish mix to get the 3D effect in the orange slices.

Thursday, March 26, 2015

Ethicare & Ethinext Acne Care - How To Treat Acne For Oily-Skin

For any of you who need basic skin care for acne prone skin and do not want to splurge too much on fancy expensive brands then do read on.

I have already shared a few products from Ethicare Remedies and Ethinext pharma. The products I am sharing today form an acne care regimen that you can follow if you have oily acne-prone skin. First of all let me introduce you to the set of products to use.

Ethicare & Ethinext Acne Care - How To Treat Acne For Oily-Skin

OK so we have 6 products there but don't worry you don't have to use all of them every day. Here is a list of what all product are shown above (you can click on the name to purchase it online)
  1. Akmasq - pimple care complexion mask (Rs 170 for 75gm)
  2. Acmed cleansing pads
  3. Sebogel - salicylic acid and nicotinamide gel (Rs 199 for 30gm)
  4. Cutishine - facewash for daily cleansing (Rs 159 for 70gm)
  5. Adaclin - clindamycin and nicotinamide cream
  6. Sepfil - mandelic acid cream (Rs 180 - 30ml)

Let us now see the steps that you need to follow and the products that help in each step.

First step to treat acne is to use a face wash to clean your face twice a day. Cutishine is a golden colored face wash that comes in a tube form with a flip cap. It is aimed at improving the complexion while controlling acne. It has glycolic acid, salicylic acid, liquorice extract, tea tree oil and aloe vera. The face wash is very gentle and does not leave the skin with a stretchy dry feeling. I have selected this particular face wash as part of a acne-care regimen because often acne leaves behind scars; using a face wash that improves complexion helps ensure that scaring will not happen.
Cutishine face wash, how to treat acne
Ethicare & Ethinext Acne Care - How To Treat Acne For Oily-Skin

After cleaning the face it is important to apply a cream that can help get rid of the acne. A good salicylic acid cream helps in doing that. For mornings use Sebogel which works on pimples and skin infections. Sebogel also helps to open up closed pores. Its a clear fragrance free gel so you can apply this below makeup as well. (Wait for the gel to get completely absorbed before applying any makeup)

In the evening you must wash your face again. After washing use the acmed cleansing pad to wipe the entire face. Acmed cleansing pad lotion works like a toner as well. You can read more about Acmed in my review HERE
At night before sleeping apply Adaclin. I have used clindamycin based creams for years recommended by my dermatologist and it really works well.

As an extra care for your skin you should apply a face mask at least once a week. Akmasq is a face mask that contains tea tree oil, turmeric, chandan (sandalwood) and vitamins.

Tuesday, March 24, 2015

Outfit Post With My New Sunglasses From Esprit

Esprit launched their Spring/Summer 2015 collection of sunglasses some time back. I chose a pair of sunglasses from Esprit this time which are very different from the reflectors you've been seeing me wearing on my instagram posts.

The sunglasses come with a box that has a jute fabric covering. It just felt so earthy - look where I did the shoot - right inside a pot :)

Esprit Eyewear - Spring/Summer 2015

The sunglasses I got have a duo chrome square frame in purple shade. The lenses themselves are a brownish purple - a darker shade at the top which fades to a slightly lighter lens shade at the bottom. I find sunglasses with such faded lenses more flattering than plain colored lenses.

There is a soft cleaning cloth inside which says "If you feel good, you look good" - which is absolutely true. You have to feel good inside to actually look good on the outside.

The material of the glasses is very good (the reason for chosing a good brand, you don't want the plastic to become so hot in summers that it burns your skin!)

The size that fits my face is medium. There are a lot of other options in the Esprit spring summer collection with varying sizes so there is something that will suit everyone.

Esprit Eyewear - Spring/Summer 2015, et19427
Esprit Eyewear - Spring/Summer 2015

These sunglasses have a category 3 filter - the filter category basically identifies how dark the lenses are. Darkness is not synonymous with UV protection by the way. A higher filter category simply means that the lenses can filter out more sunshine because they are dark. Usually a range of 0-4 is given where 2-4 is the preferred range.

Esprit Eyewear - Spring/Summer 2015, ET19427
Esprit Eyewear - Spring/Summer 2015

I wear the sunglasses irrespective of what clothes I'm wearing or what hair style I have because this is a very versatile pair of sunglasses. But to give you an idea about how it looks on me I have clicked a couple of pics. The above pic has my hair tied up in a half pony - the way I don these on my way to work.

And in the pic below I was having some fun shooting a casual summer outfit where I have worn these sunglasses with my hair freshly washed and left open.

Tuesday, March 17, 2015

Jamberry Nail Wraps Marsala In Bloom Review & Tutorial

Hi friends, I'm on a bit of a nail frenzy these days so here is again another nail post. Today I'm sharing with you nail wraps called Jamberry Nail Wraps in Marsala In Bloom. Jamberry is a consultant based service where you can subscribe to it and create your own business out of it by getting others to join you.

I wanted to try the nail wraps not for business purpose but just for the fun of having different ready-to-use patterns on my nails. So I got in touch with one of the consultants Rebecca (you can order from her by visitng here website HERE) who shipped out my first package to me.

Jamberry Nail Wraps Marsala In Bloom Review & Tutorial, pantone color of the year
Jamberry Nail Wraps Marsala In Bloom Review & Tutorial
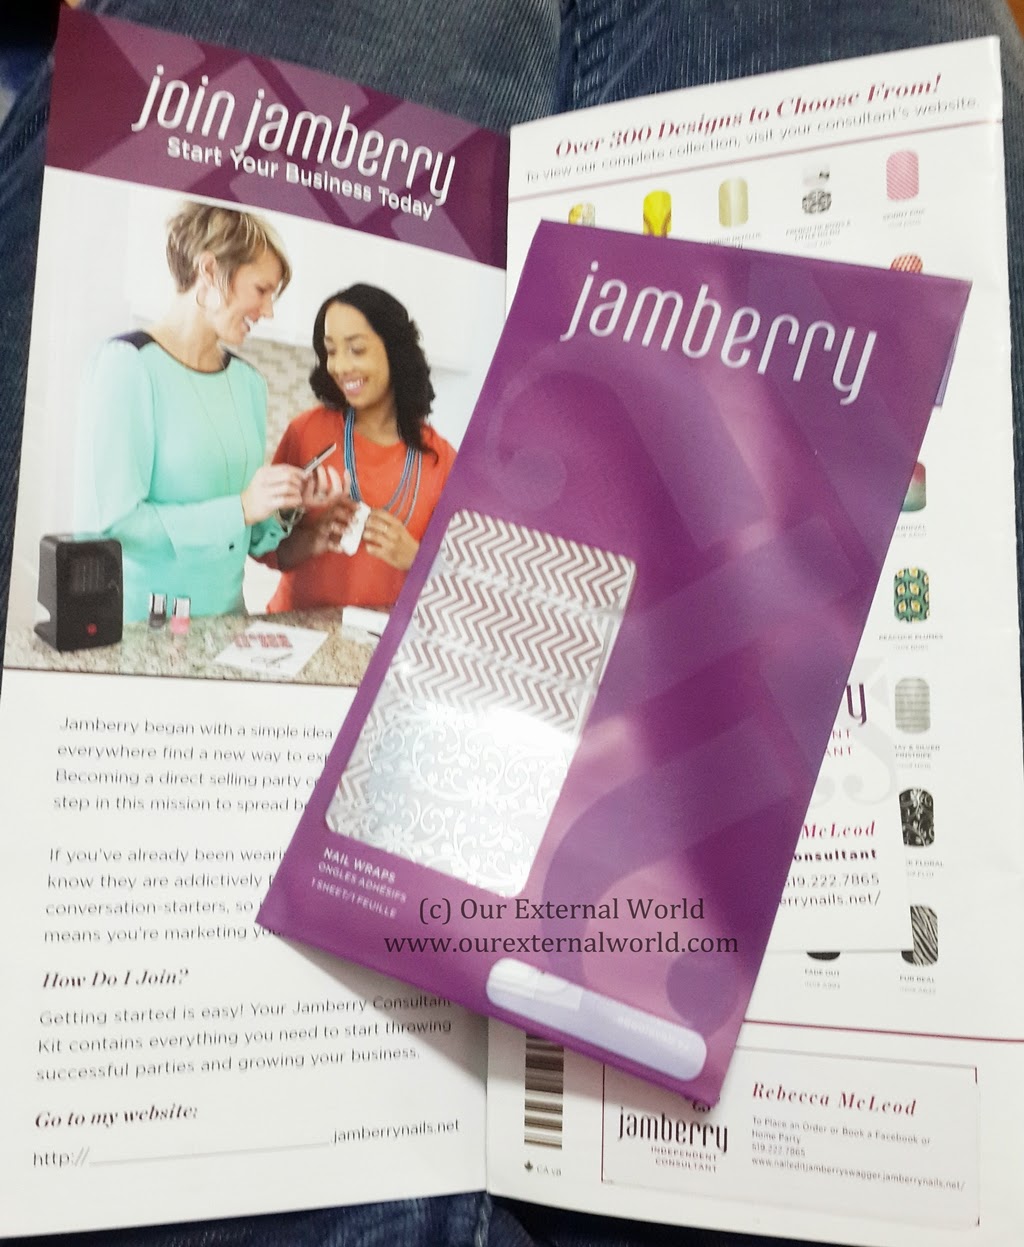
The nail wraps came with a detail instruction on how to join Jamberry to become a consultant along with a lovely purple envelope containing my strip of wraps.

One sheet has 9 wraps and you can cut them in half to use on your hands so one strip is good for both the hands. The nail wraps I got are in the pattern Marsala in Bloom - Marsala is the pantone color of the year so I chose this pattern. The design is a lovely floral pattern. The nail wraps are thin and flexible so its not difficult to cut them or apply them.

These nail wraps unlike most others available are free of odor so if you hate the smell of polish these are for you!

After proper application the nail wraps lasted me around 4 days after which they did start lifting off at the corners. I did not try them on any longer as I remove all my polish on a weekly basis - my nails grow out fast enough anyways. On toe nails these will surely last longer.

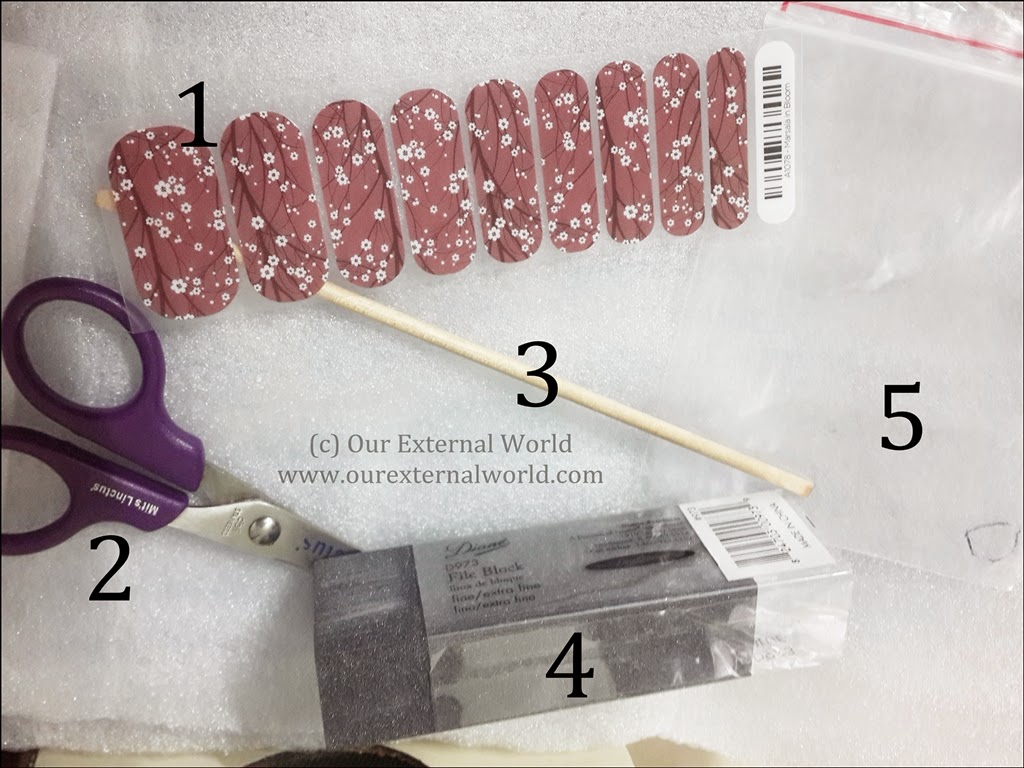
Now lets see how are Jamberry nail wraps applied. First of all get your stuff ready.

Things you will need:

Jamberry Nail Wraps Marsala In Bloom Review & Tutorial, pantone color of the year
Jamberry Nail Wraps Marsala In Bloom Review & Tutorial

1. Jamberry nail wraps
2. Scissors (preferably the ones which are small with a curved head)
3. Orange stick (you can use a soft rubber cuticle pusher as well - you need a flat surface that does not have sharp edges)
4. Nail file block (any soft nail file will do)
5. A plastic sheet (this is optional but I'll tell you why and how it helped)
6. Hair dryer (not shown in pic) - you can purchase their mini heater but if you don't have that a hair dryer will do

Once you have your supplies ready you are all set to apply these wraps for beautiful looking nails.

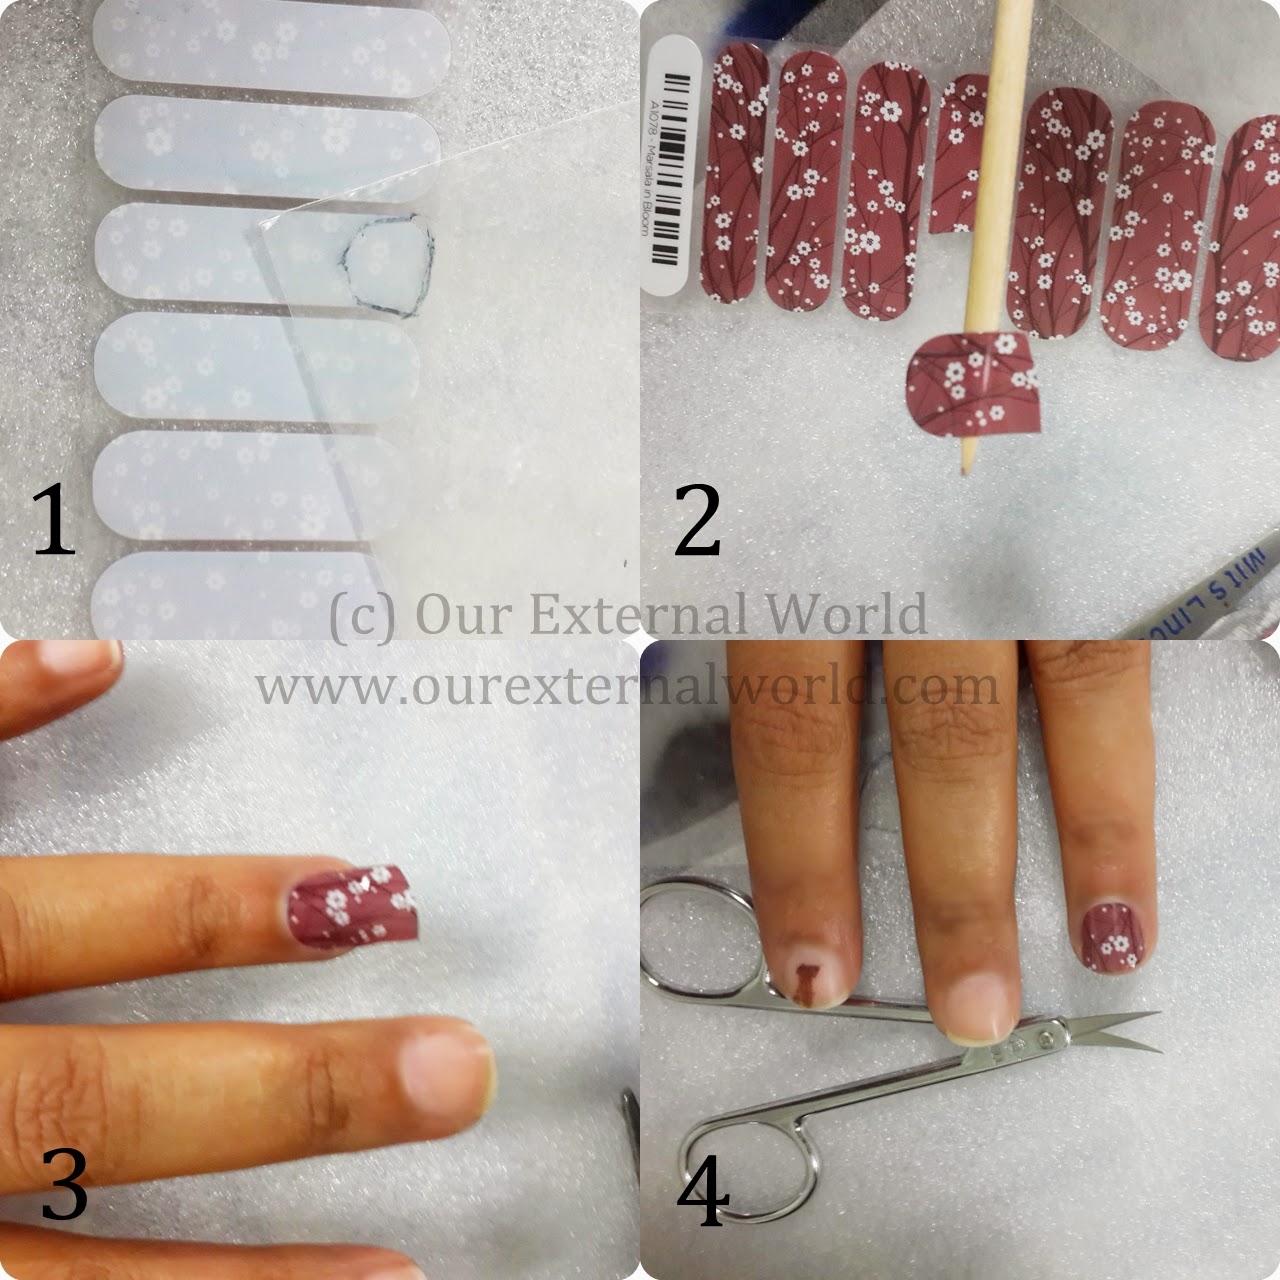
How To Apply Nail Wraps


Jamberry Nail Wraps Marsala In Bloom Review & Tutorial, pantone color of the year
Jamberry Nail Wraps Marsala In Bloom Review & Tutorial

  1. Take the plastic sheet and place it over your nail. Draw the shape of your nail on the plastic sheet. Now place this over the Jamberry nail wrap to match the correct size for your nail. This will ensure that you are using the correct nail strip and also reduce the amount of cutting off that you need to do for a cleaner finish. 
  2. Cut the required size from the strip that is close match to your nail size, the plastic guide will help you decide how much of the strip you need. Now gently lift off the wrap using the help of an orange stick as shown in the picture. Now take a hair dryer and gently blow hot air over the nail wrap. You will notice the nail wrap will become more flexible with the heat. Once you feel its flexible enough that is it will start to curve inwards - mostly a few seconds of heat is enough - you are ready to move to the next step.
  3. Carefully place the nail wrap on your nail. Notice in the picture above I have placed the wrap very close to the cuticle. Once it is in place push it down. Use your fingers to smooth it out. Take the orange stick or soft cuticle pusher to press it firmly on your nail and all along the nail surface.
  4. Now take a scissor or cuticle cutter and clip off the extra edges. This step is very easy if you have already selected the right sized nail wrap hence step 1 is very helpful.
  5. Now take the nail file and at a 90 degree angle just file away the edges until they are smooth. The filing is to be done vertically against the nail edge. 
At any point during the application if you feel the wrap is not properly sticking to your nail bed, use a bit of hot air from your hair dryer and press it back down. If you follow the steps and ensure that your nails are absolutely clean and dry before application then you should get a clean application.

Thursday, March 12, 2015

How To Do Gel Manicure - Madam Glam Gel Polishes, Review and Swatches

Hi everyone! Yesterday we learnt how to setup a UV nail lamp. Today I'm going to tell you the application process for a gel manicure and also show you swatches of Madam Glam Gel polishes that I have.

Gel manicure is normally a salon manicure in which a special procedure is used to apply gel polishes. The whole point of getting a gel manicure done is for the the longevity of the manicure. A gel manicure if done properly can last you over 2 weeks without any chips or fading. For some people it can last even longer. And the polish retains its fresh look during this time.

How To Do Gel Manicure With Soak-Off Gel Polish

1. Clean and dry your hands. 

2. Use a fine nail block to gently buff the surface of your nails. This makes the polish adhere better (I personally did not do this as I don't like buffing the surface of my nails)

3. Use an alcohol wipe to clean the nail surface (I use a wet wipe like Dettol and it works fine for me)

4. Apply a UV base coat - like normal base coats there are special base coats for doing gel manicure. These make sure that the gel polish sticks better to the nail and hence does not come off easily. After applying the base coat cure under the UV nail lamp for 2 minutes (please follow instructions on the base coat - every manufacturer has different instructions and time requirements)

5. Apply a very thin coat of your gel polish and again cure under the UV nail lamp for the time specified by the manufacturer.

6. Apply another thin coat of gel polish and cure under the UV nail lamp (this step is not required if the step 5 gives you the desired color output on your nail)

7. Apply a gel top coat and cure under the UV nail lamp. You might need to clean up what is called as 'tackiness' that is left off during curing. With the gel polishes I have I did not notice this issue.

Note that if you get any polish on the cuticle area or on any part of your skin remove it with acetone based cleaner before curing. After curing it becomes difficult to remove.

Madam Glam Gel Polishes - Review & Swatches

Now coming to the Madam Glam Gel Polishes. These polishes come in dark black bottles with color coded lids. I love the packaging. It is important for gel polish bottles to be kept in a dark place hence the dark bottles - this prevents the polish from spoiling. The color coded lids make it easy for you to search through your stack. The applicator brush is wide enough to give you an even streak free application.
How To Do Gel Manicure - Madam Glam Gel Polishes, Review and Swatches, tutorial
How To Do Gel Manicure - Madam Glam Gel Polishes, Review and Swatches

I have the polishes numbered 142, 289 and 347. 

Wednesday, March 11, 2015

How To Setup A UV Nail Lamp For Gel Manicure

Finally friends after taking so long to post this - here is a post where I will tell you all that I have learnt about Gel Manicures. And the first step for a gel manicure is to setup your UV nail lamp.

I purchased my UV nail lamp online (and if you follow me on Facebook you would know that I ordered two by mistake and am trying to sell of one of these - so yup if you need one leave me a comment so that I know!)

So the UV nail lamp came in a regular cardboard box and it had 4 UV lamps of 9W each. The lamps were packaged individually. The base of the UV Nail Lamp slides out so that you can see the sockets where the UV Lamps are to be inserted. You need to be careful, align the ends properly before gently pushing it inside. Once all the 4 lamps are inserted properly, slide back the base and you are ready to go.

How To Setup A UV Nail Lamp For Gel Manicure, tutorial

Now most gel polishes will clearly mention the duration for which you need to keep your nails under the UV light. Most of these say 2 minutes in a 36W lamp. Notice that the total power of my UV Lamp is 36W (4 x 9W).

As you can see setting this up was simple and easy. Next we will learn about how to actually do a Gel manicure.

This lamp cost me Rs 1400 per piece. In India its available for around Rs 4000. In case you want to purchase the extra one I have let me know.

Follow Me On instagram | facebook | pinterest

Wednesday, February 25, 2015

How To Manage a Blog with a Full Time Job

A lot of times I get asked on how I manage to blog with a full time job. And my answer is that I struggle everyday to try and manage it. Put point blank - it is not easy. Blogging requires you to not only write about what you have to say but also requires you to click pictures, edit them and then once a post is up you need to make sure it reaches the right audience.

I love clicking pictures so for me shooting the products is my favorite part. At times I feel like just sharing what I clicked instead of a full write-up and that is where Instagram steps in.

How To Manage a Blog with a Full Time Job, MyAsusZenFone, Asus Zenfone 5, Asus India
How To Manage a Blog with a Full Time Job

The above picture was actually taken while I was discussing something related to a blog post in the winter month of December. My phone makes a huge difference in the way I work now, there are so many things I can take care of while on the move.

So here are a few pointers on how you can manage your blog along with a full time job. And by job I don't mean just an office job. If you are a home maker then your entire day is already choc-a-block with household chores. The only difference is that you don't have to stick to a tight schedule. I do hope these tips help you whether you have an office job or whether you are a homemaker.

How To Manage a Blog with a Full Time Job


1. Set up a frequency that works for you. Start with say one post a week and then based on time availability you can increase this frequency. Chose a predefined day when your post would go live so that your audience knows when to expect a post from you.

2. Irrespective of when you can actually write your posts can follow a schedule using features of blogger that help you pre-schedule your posts. So let's say one day you had 2 hours to blog instead of the usual 1, so you can write up two posts and while one of them goes live immediately you can schedule the other to go live the next week. This way you have already started a pipeline of posts. This is super helpful as it makes sure your post frequency is not disturbed in case there are times when you can't sit and write. 

3. Try and click pictures of products at one go. This way you can manage your camera and editing of pictures together. Then when you come down to actually writing up the post it will take less time and you will always have half the work done for your future posts. I try and click all photos on weekends in natural light. This gives me better pictures that need less editing.

4. If you want to engage with your audience on facebook, make use of networkedblogs that allow you to auto-sync your posts to your facebook page. So now you don't have to worry to share the links manually.

5. Use features in your phone that allow you to quickly edit as well as share on instagram, facebook and other social media. This will help you create a buzz around what products you are going to feature in your coming posts. Asus Zenfone is android based and it can come in very handy using nifty photo editing softwares along with the default camera options on the phone. Click, beautify and post. (And don't forget to listen to your favorite music; music always eases out any tensions that work may bring)

How To Manage a Blog with a Full Time Job, MyAsusZenFone, Asus Zenfone 5, Asus India
How To Manage a Blog with a Full Time Job - MyAsusZenFone At Work

Sunday, February 1, 2015

5 Tips On How To Style A Bright Sweater For Work

Hello everyone! I have been trying to add lots of color to my winter wardrobe. I am in love with corals and picks and reds. And this year I also decided to wear my favorite formal suit to work. There is no dress code at office so I did not want to make it look too formal so I decided to merge my love for color with the somberness of a formal suit.

Let me show you how I combined my current favorite bright coral sweater with my formal blazer.

5 Tips On How To Style A Bright Sweater For Work, asus zenfone, fashion post
5 Tips On How To Style A Bright Sweater For Work

Coral looks really pretty with a deep navy blue suit. Instead of wearing the complete suit I chose to wear my navy denims (not in the pic). For the feet I chose to wear my current favorite small heeled boots in black swede. I painted my nails with Ella+Mila Sunkissed which is a lovely soft coral polish.

If you zoom into the pic I tried to capture my tiny golden swirl studs that I wore with it. Also captured in the pic above is my blogging partner Mr Zenfone (you can read about how he's been helping me out in a post HERE). This phone is such a darling, a stunner in terms of looks and I just discovered this cool mode where you can make the touch on Asus Zenfone 5 work even if you are wearing gloves. So helpful when you have hands that are freezing in the cold. There is also a golden version of #MyAsusZenFone phone that is super classy (check it out HERE). My phone accompanies me 24 hours of the day so having one that looks good is surely a fashion hit.

If you are trying to add bright colors to your work wardrobe here are a few pointers that will help you out.

  1. Make sure the colored piece is the only bright piece in the outfit.
  2. If its a bright sweater or a bright shirt try and keep it plain in terms of pattern. A mixture of very bright colors can be tricky.

Friday, December 19, 2014

How To Use Dettol Multi-Use Wipes, Review and Price

How many of you have used Dettol in their household? As far back as I can remember we have always had a bottle of Dettol at home for first aid. Dettol was added to bath water to prevent prickly heat during the scorching summers and Dettol was used to clean away wounds.

Dettol sanitizers made their way into our handbags over time and now I am glad to see the benefits of Dettol made available in the form of easy to use wipes.
How To Use Dettol Multi-Use Wipes, Review and Price

Dettol Multi-Use wipes come in a pack of 10 or 30 sheets. I have the pack containing 30 sheets. The pack has a re-sealable opening from which you can take out a wipe to use while the remaining wipes remain dust free. To prevent the wipes from drying out always keep such packets with the closing side downwards - this ensures that the wipes don't dry out due to contact with air.

Dettol multi-use wipes are great to carry with you. If you are traveling in a hot area you can use these to wipe off the germs and grime from your face. Because these wipes contain Dettol they are better than regular face wipes because they kill the germs as well. And these wipes have special skin care emollients which can keep the skin moisturized.

How To Use Dettol Multi-Use Wipes, Review and Price
You can use these multi-use wipes to clean up any surface (except carpets or rugs which are not good surfaces to clean with such wipes) - but if you are worried about hygiene in any public place simply wipe the surface you will come in contact with.

Now with the ability to kill germs - the best use for these wipes that comes to my mind is to wipe off toilet seats in a public toilet. Yes, I am very finicky about using a public toilet and always always freak out if I see a dirty toilet seat. With these wipes you can wipe of the seat before using it. Easy to use and great for sanitizing anything you come in contact with!

Price: Rs 115 (30 wipes)

You can buy these wipes on amazon.in or flipkart.com

Read on to know more about these multi-use wipes below.

Monday, June 30, 2014

Treat Your Makeup Brushes With Respect . . . And They Will Love You Back

Treat Your Makeup Brushes With Respect . . . And They Will Love You Back

Guest Post By Dana

Never underestimate the power of the makeup brush – a first class, well designed, clean, new and well chosen makeup brush can make a world of difference and help you to get a professional finish on your makeup – even if you’re an amateur with timing issues, always in a hurry and usually applying your lip gloss on the bus on your journey to work.


Treat Your Makeup Brushes With Respect . . . And They Will Love You Back

If this is a pretty accurate picture of you – okay, maybe you take the train in the mornings but you know who you are – then not only do you need a great set of makeup brushes but you also need the right type of makeup brush holder to keep your brushes clean and the inside of your bag makeup free. That new shade of lipstick might look fabulous on your lips but do you really want it daubed all over your new iPhone cover? No, I didn’t think so.

Sunday, April 20, 2014

Summer Nail Art - Sea Creatures - With Tutorial

I finally captured pictures at different steps of doing my free hand nail art as requested by a lot of you. I hope you like it! Today's nail art is another one part of the Summer Nail Art series and the topic is Sea Creatures.

Summer Nail Art - Sea Creatures - With Tutorial


Summer Nail Art - Sea Creatures - With Tutorial
First lets take a look at the base. I used Maybelline Color Show Blueberry Ice (403) as the base. Once it dried up I used the GQ Professional Nail Color in White and number 310 from Tenno Color. Both GQ and Tenno are local Delhi based nail polish brands (that is what the shopkeeper told me - have never heard or seen these before but I liked the quality and bought a few of these).

Tuesday, April 1, 2014

Welcome Back Summers - Chevron And Lines Nail Art Tutorial

Today I'm sharing a nail art which I've done to welcome summers as part of the STNChallenge. This nail art is also part of my Illchallenge where the theme is chevron and lines. Yes here I go again trying to do two things in one go.

Welcome Back Summers - Chevron And Lines Nail Art
Please excuse my super dry cuticles - they aren't dry in person but don't know why they look like this in the pictures :(

I've chosen lovely pink colors because summers are the time when all my lovely pink dresses come out of the closet. The base is Diana of London Nail Paint shade City Glamor (check the link for proper swatches), then I used China Glaze Fifth Avenue for the inner chevron and Lakme Lavender Lush for the outer chevron and ring finger. Flowers are done using Lavender Lush and everything white and green is acrylics.
Welcome Back Summers - Chevron And Lines Nail Art

And to add to the summer feel I've added tiny flowers on two nails. This time I've done a tutorial as well so I hope you all enjoy it.

Thursday, March 20, 2014

How To Clean Your Makeup Brushes

Are you worried about washing your expensive makeup brushes, worried that they might lose their softness or shape? Well worry no more, check out this visual graphic by Sigma which shows you how to wash your brushes the correct way.


You can buy Sigma Brushes at sigmabeauty.com and if you want to get hold of this lovely glove then check it out HERE. Don't forget to use the coupon MAR2014 to get a 10% off.

Image is owned by Sigma Beauty.

Friday, February 14, 2014

Striping Tape Mani - Valentine's Day Special (Tutorial)

Here is a quick nail art you can do on Valentine's day - you can swap the colors I used with a combo of red and white or red and black. Striping tape is a thin tape that is available at nail art supply stores. I will explain the basic steps for beginners (this is my first try with striping tape!)
Striping Tape Mani - Valentine's Day Special

1. Begin by painting your nails in the color you want to show up when you remove the tape. I alternated with a teal and a brown shade as a base. Let this dry completely.

Monday, January 27, 2014

How to Get Rid of Lipstick Stains

Bright lipstick can be an amazing eye-catcher, and makes even a simple outfit look special. But while everyone loves a long-lasting colour on the lips, it can be quite a hassle to get rid of lipstick stains on fabric. Fortunately, there is no need to let lipstick marks ruin your favourite clothes! With some basic know-how, removing lipstick is no problem at all. Take a look at this simple guide for getting rid of lipstick stains from different kinds of fabric with the help of hairspray, detergent and your trusted washing machine, and enjoy your blouses and dresses with no fear of permanent red and pink marks!

linkwithin