Our External World - Indian Makeup Beauty Fashion Travel
Showing posts with label Maybelline Color Show. Show all posts

Friday, June 17, 2016

The Body Shop Colour Crush And Other Polish Swatches

This is a quick post for you guys while you wait for me to put up the pictures from my recent trip.

I have swatches of two polishes from The Body Shop - Color Crush range. The first one is a beautiful teal blue shade called Minty Amour.

I have used Maybelline Color Show Blueberry Bombshell on the accent nail on top of the Minty Amour. 

The Body Shop Colour Crush And Other Polish Swatches, Minty Amour, Blueberry Bombshell
The Body Shop Colour Crush And Other Polish Swatches

The next polish is a rich plum called Deeply In Love. The is a lovely shade for Indian skin tones and quite perfect for wedding as well.

For this one I used Pastel Dots which is a glitter topper from H&M. It has hexagonal particles in pale pink and white along with tiny circular black glitter.

The Body Shop Colour Crush And Other Polish Swatches, Deeply In Love, Pastel Dots from H&M
The Body Shop Colour Crush And Other Polish Swatches

The Body Shop Color Crush polishes are opaque and do not chip easily. These are vegan, 5-free polishes.

I haven't yet seen these in stores in India but you can find these in UK for £5.00 for 6.8 mL

Have you tried any of the color crush polishes?

Follow Me On instagram | facebook | pinterest

Tuesday, May 24, 2016

HPB Presents Sugar Spun Neutrals And Neons

Hi friends! Here is a quick and simple nail art to brighten up your week!

It finally rained and even though the weather is still hot, the rain was a welcome breather! The theme for Hobby Polish Bloggers for them month of May is Neutrals and Neons. And the technique challenge at Those Nails Though was sugar spun nails.

As always I decided to club two tasks into one and came up with Neon Sugar Spun Nails.

If you want to find out about Sugar Spun Nail Art technique then you should check out my post Girly Girl Nail Art Challenge

And here you go, the nail art I did this time.

HPB Presents Sugar Spun Neutrals And Neons, nail art,
HPB Presents Sugar Spun Neutrals And Neons

I have one more pic which was taken indoors. I love this neon green by Madam Glam. Its just so in-your-face neon!

The pink is Elephantine Pink by O.P.I.

Wednesday, April 27, 2016

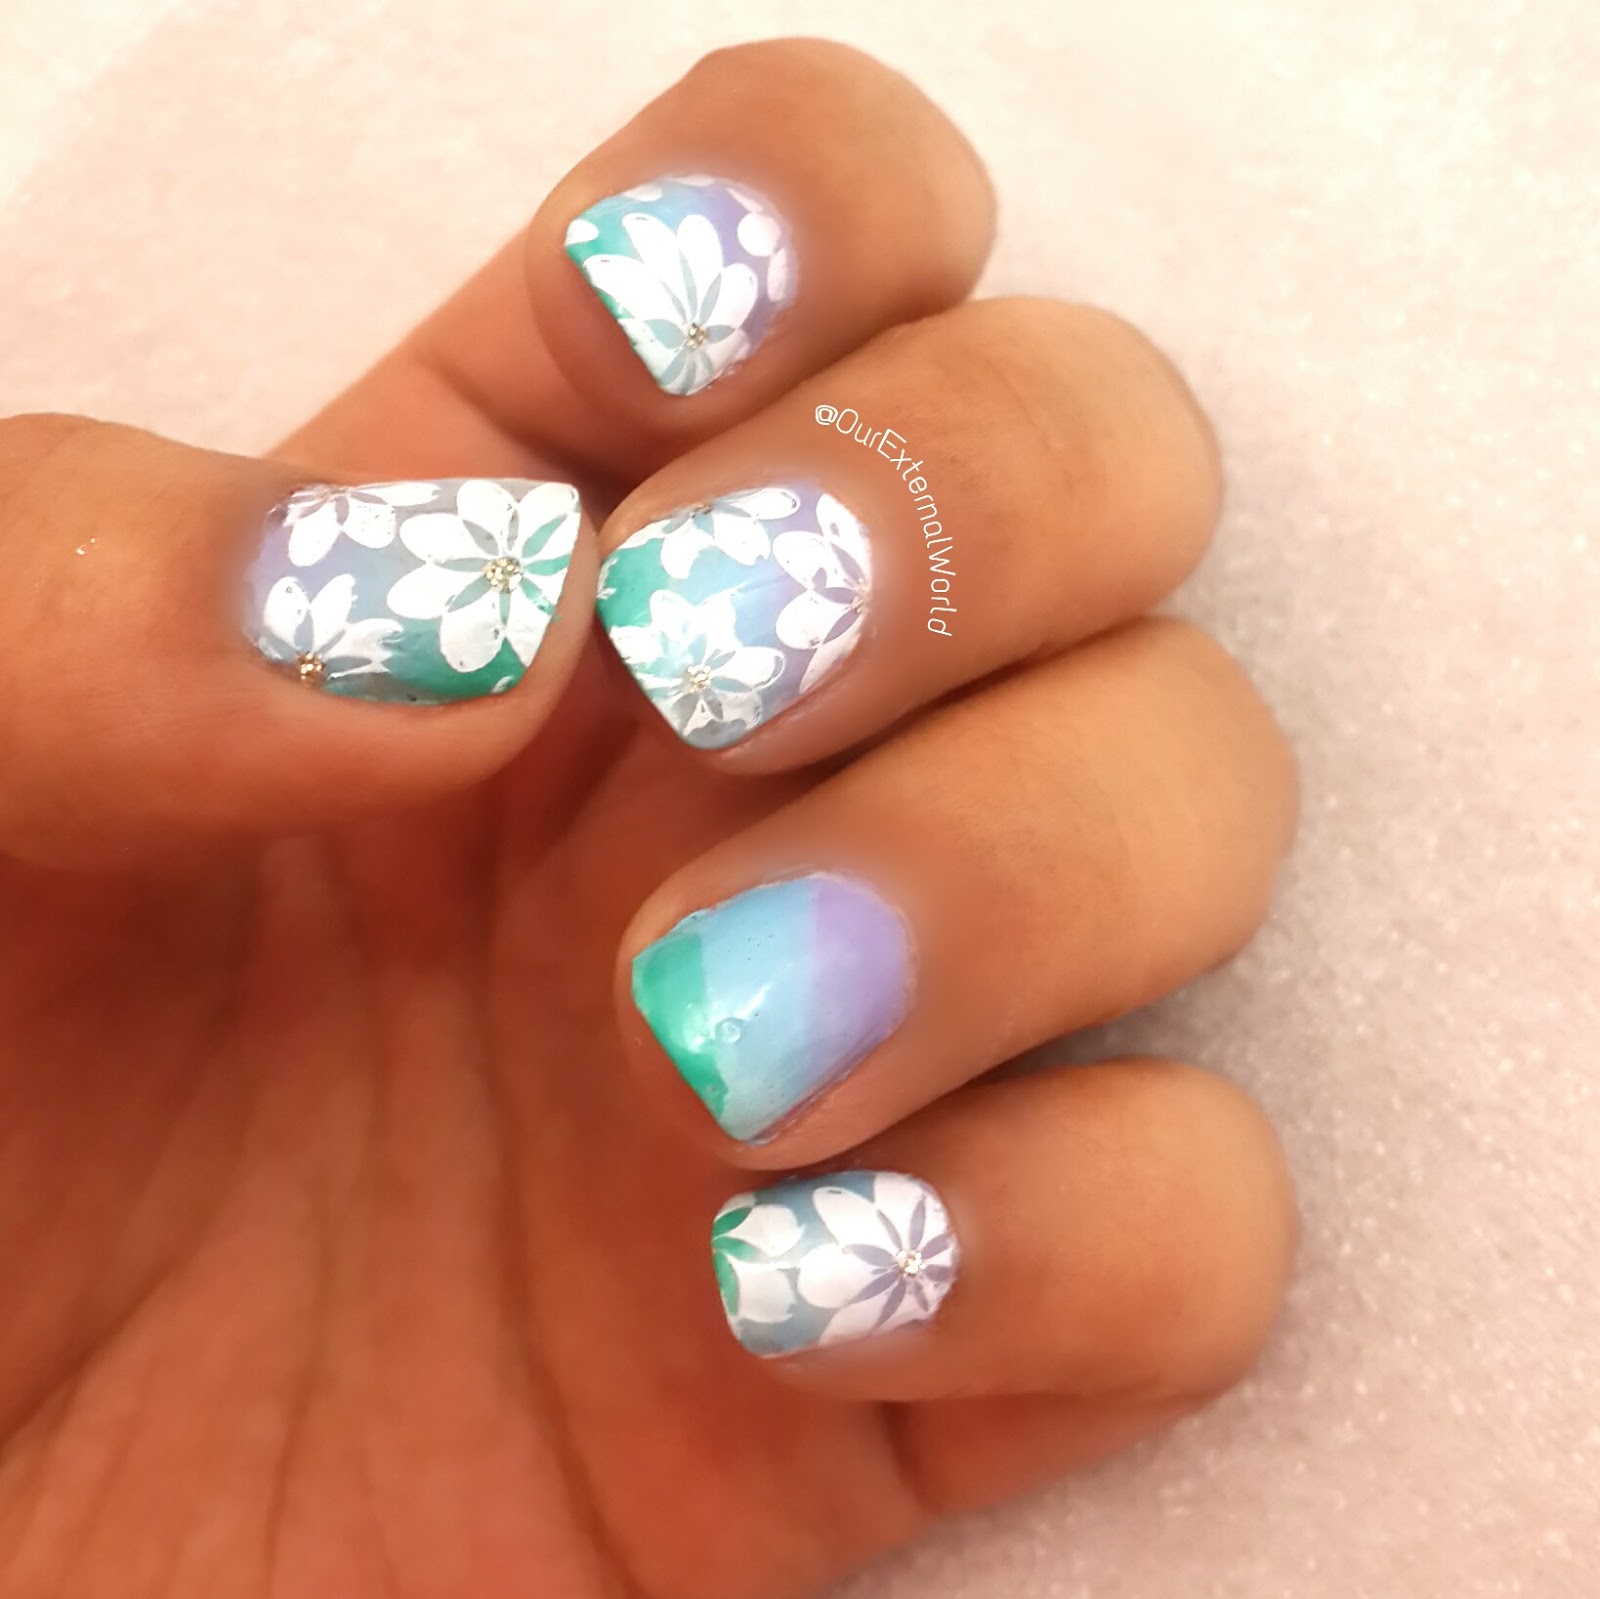
Diagonal Gradient Nail Art

 Hi guys! Today I have another nail art post for you all. This time its for a dual challenge.

I had to do a diagonal gradient technique challenge for #tnttech (part of the Those Nails Though group on Facebook) as well as the #tnttwinnails challenge. So since I'm super lazy I decided to combine both the challenges in one nail art.

As part of the Twin Nails Challenge I got paired with Krystal Moore (@queenofnails83 on instagram) She is one of the admins at Those Nails Though and is the one responsible for inspiring me to get back to nail art with her fun challenges!

 The technique challenge was to do a diagonal gradient. And the twin nail challenge was to replicate a nail art done by your partner. So here is the nail art that I did this week.

Diagonal Gradient Nail Art, tnttech, tnttwinnails, those nails though, stamping nail art
Diagonal Gradient Nail Art

The base was created using sponging with 3 different polishes. To create a diagonal gradient all you have to do is sponge the nail in a diagonal manner instead of horizontally. I used two color show polishes and one local polish in teal.

Wednesday, April 20, 2016

Twin Nails Challenge - Dragon Fruit Nail Art

After what seems like ages I finally have some nail art on the blog. I'm part of a nail art enthusiastic group on Facebook called Those Nails Though. This group came up with a twin nails challenge and the theme was fruits.

I was paired up with Xochitl Ayala who is famous on Instagram as gurlynailz - Xochitl does amazing nail art. I love her immaculately well kept nails and her eye-catching nail art. Do visit her on instagram to see her amazing nails.

So Xochitl showed me a few pictures that we could use as inspiration - and a picture of the Dragon Fruit caught my attention. Such bright colors that I instantly agreed to it. We decided on a rough sketch of how we will do the mani and left the rest to our imagination.

So the first picture is my attempt at this mani. I have captured the cut portion of the fruit on all nails except the accent finger where I wanted to add the bright green touch. I created little dry marbled decals to give a sort of 3D effect but they just stuck to my nails so there is no 3D effect anymore but I like how it looks merged into the base color.

Take a look!
#TNTTwinNails Dragon Fruit Nail Art
Twin Nails Challenge - Dragon Fruit Nail Art

The polishes I used are:
Maybelline  ColorShow Hooked On Pink
Maybelline ColorShow Sunshine Yellow
Madam Glam Neon
A local black and white polish

Now Xochitl did the same basic design but a more neater version and I just love her long nails! You can tell that she is a seasoned nail artist!
Twin Nails Challenge - Dragon Fruit Nail Art, gurlynailz
Twin Nails Challenge - Dragon Fruit Nail Art


Overall I had fun doing this challenge. I have made so many friends from across the globe where we have connected due to nail art. And Xochitl is a really nice girl I've come to know through this #tnttwinnails challenge.

Sunday, September 6, 2015

Maybelline Color Show Lipsticks - Red Rush and Orange Icon - Review, Price, Swatches

It's raining red and oranges in the lip industry. Every where I turn to I see a ravishing red or a bold orange. Today I'm going to quickly share two lovely lipsticks from Maybelline Color Show - Red Rush (211) and Orange Icon (308).

Maybelline Color Show lipsticks are packaged in a simple black casing with a band of plastic denoting the color of the lipstick. 

Maybelline Color Show Lipsticks - Red Rush and Orange Icon - Review, Price, Swatches
Maybelline Color Show Lipsticks - Red Rush and Orange Icon


Maybelline Color Show Lipsticks are extremely light on the lips, they feel like a balm almost but have a rich intense color. 

Texture: Smooth and moisturizing
Pigmentation: High (based on different colors, lighter shades are less opaque)
Staying Power: approx 3 hours without food
Staining: leaves a light tint behind (which I prefer)
Availability: online and at all Maybelline counters
Shade Selection: I think they have about 70 different shades to choose from

Thursday, July 23, 2015

HPB Presents Starry Night Sky

I am participating in this month's HPB linkup and the theme is Starry Nights Sky. I wanted to do galaxy nails because I've been wanting to try them since a very long time. But as luck would have it, I did not get enough time to create a new nail art for this theme.

I am instead sharing a nail art I did some months back - I think it suits the theme perfectly.

HPB Presents Starry Night Sky, black and silver, glitter polish, glitter mania, maybelline
HPB Presents Starry Night Sky


For this nail art I used El Corazon metallic silver polish as my base. Then I used star nail vinyls from Angel Nail Studio. These vinyls are made by my friend Veeral who owns Angel Nail Studio. The vinyls are easy to use. You peel off the star shaped vinyl, place it firmly over a completely dry base. Top it with the Maybelline Glitter Mani Starry Nights (I love this polish!) and you are done!

To get hold of the vinyls contact her on her instagram account @angel_nailstudio

Sunday, July 19, 2015

Maybelline Bright Sparks - Glowing Wine #704 - Review, Price, Swatch

Maybelline Color Show range of polishes are so affordable that you can't stop until you have each shade with you. Today I'm sharing a shade from the Bright Sparks collection.

Maybelline Color Show Bright Sparks Glowing Wine 704 comes in the transparent bottle with a black screw cap. 

Maybelline Bright Sparks - Glowing Wine #704 - Review, Price, Swatch

Glowing Wine is a deep wine coloured polish with golden shimmer. The shimmer is extremely fine just like in chrome polishes. It lends a unique shine to the nails without appearing distinctly on the nail. It was difficult to capture the shimmer in the pictures but if you enlarge one of the pics you should be able to see it in the bottle.

Price: Rs 100

Tuesday, June 16, 2015

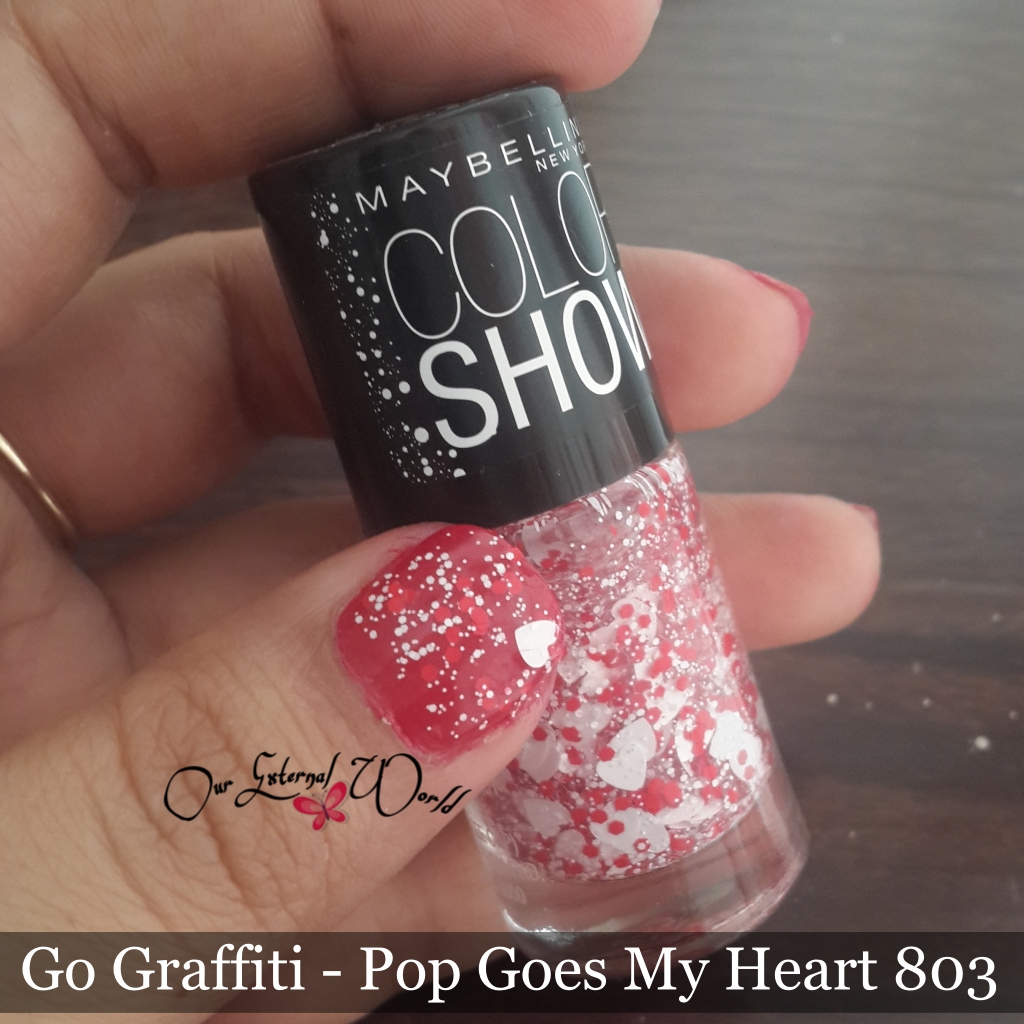
Maybelline Color Show Go Graffiti - Pop Goes My Heart #803 - Review, Swatch, Price

Maybelline Color Show Go Graffiti - Pop Goes My Heart #803 - Review, Swatch, Price

Hello everyone, today I'm sharing a quick review of one polish from Maybelline India Go Graffiti range. This range is a glitter polish range where different sized glitters have been added to the polish. Pop Goes My Heart is a clear polish with lots of tiny white specs, slightly larger red hex glitter and lots of heart shaped glitter.

Tuesday, April 7, 2015

Envy Polish - Laminate, Review, Swatch, Nail Art

Hello friends, I am back with another nail art I posted on Instagram sometime back. This one is inspired by the book Pride & Prejudice.

Envy Polish - Laminate, Review, Swatch, Nail Art, pride and prejudice, book inspired
Envy Polish - Laminate, Review, Swatch, Nail Art

The base polish I used for this nail art is Envy Polish - Laminate (005). Laminate is a fawn colored polish with a very slight green base. It was the perfect base I was looking for to match the cover of the Pride and Prejudice book.
Envy Polish - Laminate 005, Review, Swatch, Nail Art
Envy Polish - Laminate, Review, Swatch, Nail Art

The polish is well pigmented and goes opaque in two coats. It does not chip or fade for 3 days (without any top coat).

Price: Rs 50 (at Health & Glow stores Mumbai)

I have already raved a lot about the Envy polishes and how much I love them for such an affordable price range.

Thursday, April 2, 2015

The Great Gatsby Inspired Nail Art

MoYou London recently held a contest based on some books. One of the books that were part of the contest was The Great Gatsby. 

I searched for images on google from the book and movie by the same name and came across a picture that looked perfect. It has the start black and gold patterned backdrop with the leading lady standing in-front wearing a gorgeous pink dress.

The Great Gatsby Inspired Nail Art

The black backdrop was clear in my head - black polish with golden stamping would do it. For the dress I wasn't sure how to get that leafy lace effect. Finally I decided to try double stamping. I applied Sally Hansen Salon Manicure in shade So Much Fawn (reviewed HERE) and then used Maybelline Porcelain Party to stamp on leaf images from Uber Chic Beauty Collection 2-02 (used plate 2-03 for the golden stamping).

Monday, March 16, 2015

UberChic Beauty Stamping Plates Collection 02 Review

Hello everybody! Have you seen my recent nail art posts on instagram? If you have, you would've noticed that I am doing stamping using the new UberChic beauty stamping plates. So here is my review on these plates.

I have collection 02. This collection has 3 plates. Each plate comes with the standard blue protective covering. The plates are smooth at the edges.

UberChic Beauty Stamping Plates Collection 02 Review


UC2-01 is based on the theme of coffee, party and some optical illusion patterns.
UC2-02 has mixed designs from floral, optical illusion, and love.
UC2-03 is all about travel.

Each plate has 24 large patterns and many tiny text and images. All the designs have been created so that even if you have small nails like mine, you can still get the image to show up on your nails. The designs are 17 x 21mm. Each plate is 9.5cm by 14.5cm.

I stamped some of the patterns from each plate very quickly using a Maybelline ColorShow Black Out (this is not a stamping polish but is a very affordable polish a Rs 85 that stamps well)

UberChic Beauty Stamping Plates Collection 02 Review

All the images stamp very well.  I love how the images are very finely etched. When I was trying these plates out I just felt like stamping had all of a sudden become very simple - except for the world map image, all others were so easy to stamp.

Tuesday, March 3, 2015

What is Reverse Stamping Nail Art

I haven't been able to complete all my nail art challenges for February. But I really wanted to try out this technique called reverse stamping.

Reverse stamping is essentially a technique where you pick the design from the stamping plate (like normal stamping) but instead of stamping it onto your nail, you first fill it with some color and then create a sticker sort of thing from this pattern.

What is Reverse Stamping Nail Art, el corazon, fashionista #02, maybelline black out, tutorial, how to
What is Reverse Stamping Nail Art

There are two methods of creating the sticker.

Reverse Stamping Method 1
1. Stamp an image on your stamper
2. Color in areas that you wish (use polish though acrylic colors will work too)
3. Use a clear polish or top coat to cover the entire design on the stamper.
4. Let it dry - let it dry for a few hours so that you can peel it off from the stamper and place it on your nail just like a sticker.
5. Put clear polish on your nail, place the sticker from step 4, and trim it off as required.
What is Reverse Stamping Nail Art, how to, tutorial
What is Reverse Stamping Nail Art

Reverse Stamping Method 2
Another technique of reverse stamping is where you create the sticker on a plastic sheet.

Wednesday, February 18, 2015

Peacock Nail Art Using BornPrettyStore Stamping Plate BP04

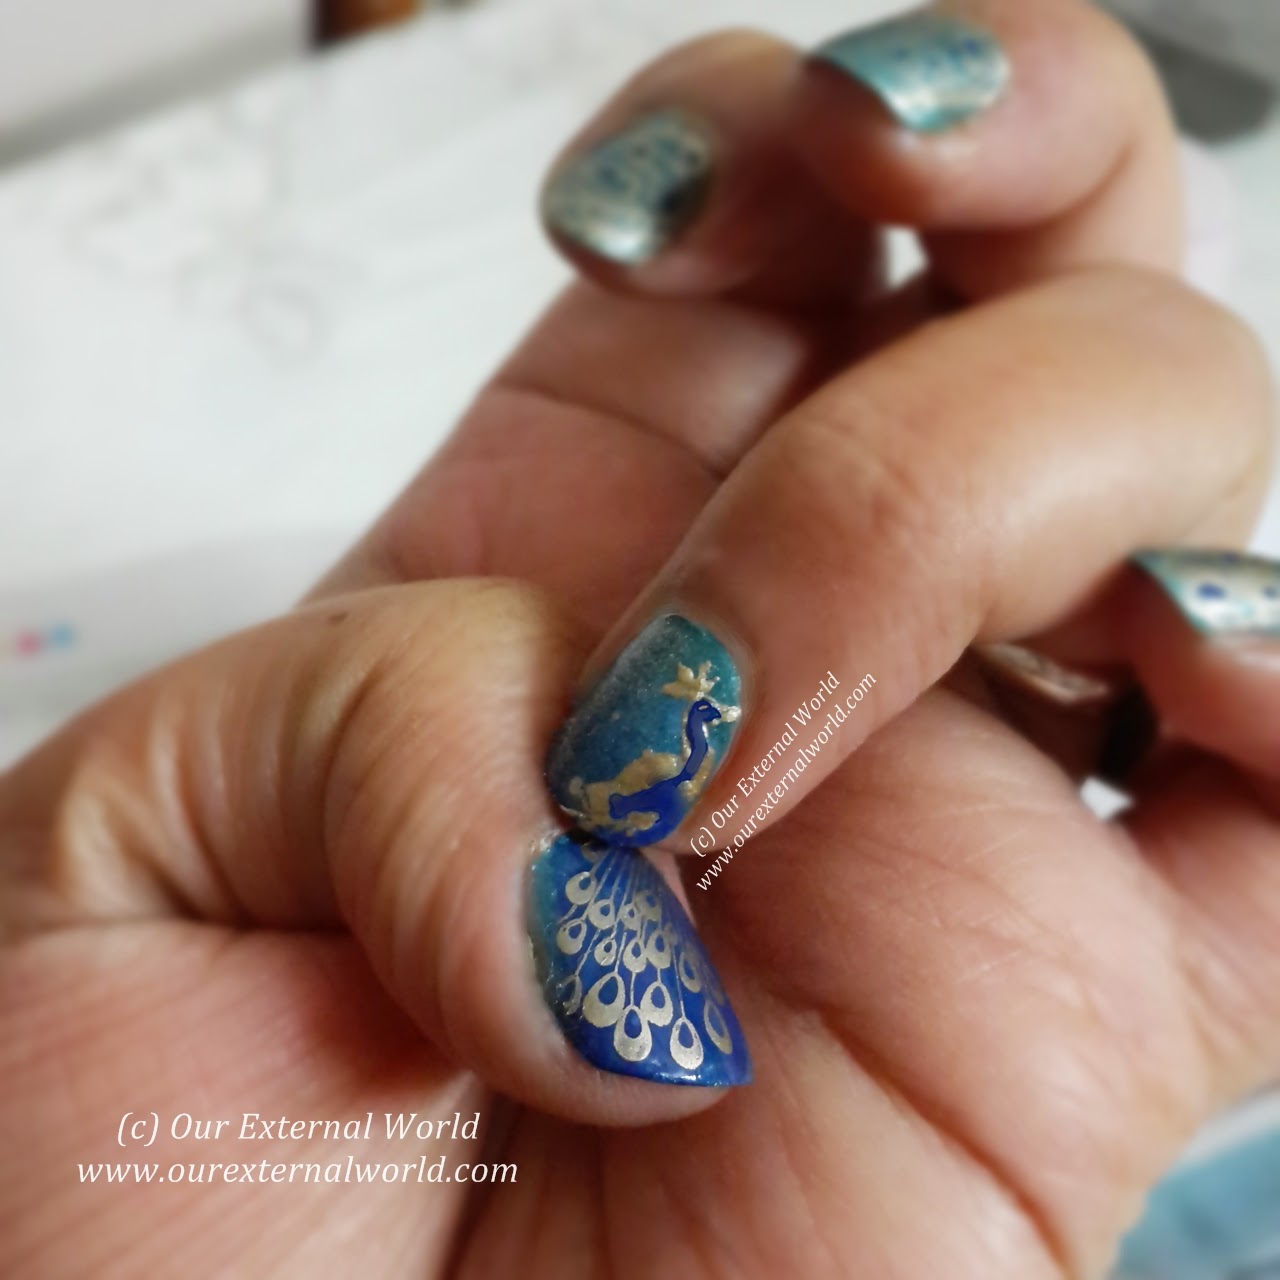
Hi everyone, today I am sharing a nail art that I did probably a month ago but never got a chance to share. I have always wanted to do nail art on the theme of peacocks and was ecstatic when I got this lovely plate from bornprettystore.com.

The plate is called BP-04 and has the patterns of peacocks and a beautiful dancing girl on it. There are small peacocks, a larger one and then one in XL size with a lovely background. The plate is etched out well and I was able to easily pick up the thinnest lines from the plate.

Peacock Nail Art Using BornPrettyStore Stamping Plate BP04

If you wish to purchase this plate (or other lovely plates from BPS) you can use the code HPG10 to avail 10% off on your purchase.

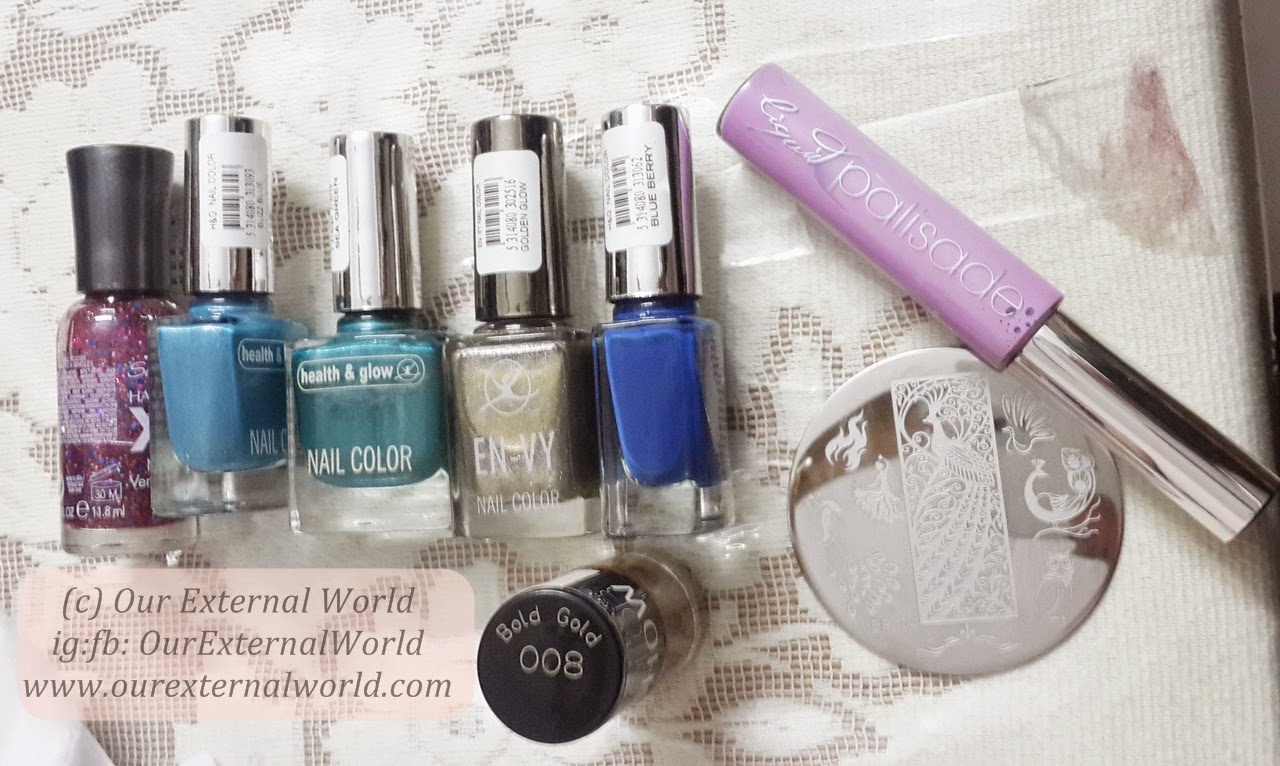
For this particular nail art I used 6 polishes and also tried the liquid palisade. I will review the Liquid Palisade in a separate post.

Peacock Nail Art Using BornPrettyStore Stamping Plate BP04, envy polish, health & glow, liquid palisade
Peacock Nail Art Using BornPrettyStore Stamping Plate BP04

Polishes used for the base - Sally Hansen,  Health & Glow Buzz Blue, Sea Green, and Envy Golden Glow & Blue Berry. I stamped with Maybelline Color Show Bold Gold.

For the base I first sponged the blue polishes along with a hint of the glitter polish. Then I used the XL image to stamp just the background onto all my nails except the thumb and accent finger.

For the accent finger I stamped the large peacock head and its tail I stamped over the thumb. Then using a tooth pick I added dots of blue on the fingers to make the pattern stand out.

Peacock Nail Art Using BornPrettyStore Stamping Plate BP04

I really liked the outcome of this nail art and mixing the blues as the base for sponging made it stand out. If you  notice on the accent finger I have gently sponged a bit of golden on the side of the peacock as well.

Thursday, October 16, 2014

Glitz & Glam Diwali Nail Art With El Corazon Confetti No517

STN Challenge / ILL Challenge second theme for nail art is Glam n Glitz - Diwali is all about light and sparkles so I chose  a gorgeous glittery polish from El Corazon. 

El Corazon Confetti No 517 is rusty maroon with bronze, gold and very fine silver glitter. The silver doesn't look silver on the nails but when you remove the polish you will notice that there are silver glitter in the polish. Confetti no 517 has a jelly like finish and looks so pretty in person. Trust me the pictures do not do justice to the actual beauty of this polish. Once my nails grow longer I will re-swatch this lovely polish and post on instagram. You see I still have fading henna on my hands which will also take a few weeks to go away completely.

Glitz & Glam Diwali Nail Art With El Corazon Confetti No517 swatch
Glitz & Glam Diwali Nail Art With El Corazon Confetti No517

Confetti No 517 is perfect for the Indian festival season. If you have a wedding coming up you must get this in your kitty (or you can try and win this and other polishes from El Corazon in my giveaway HERE)

Saturday, July 12, 2014

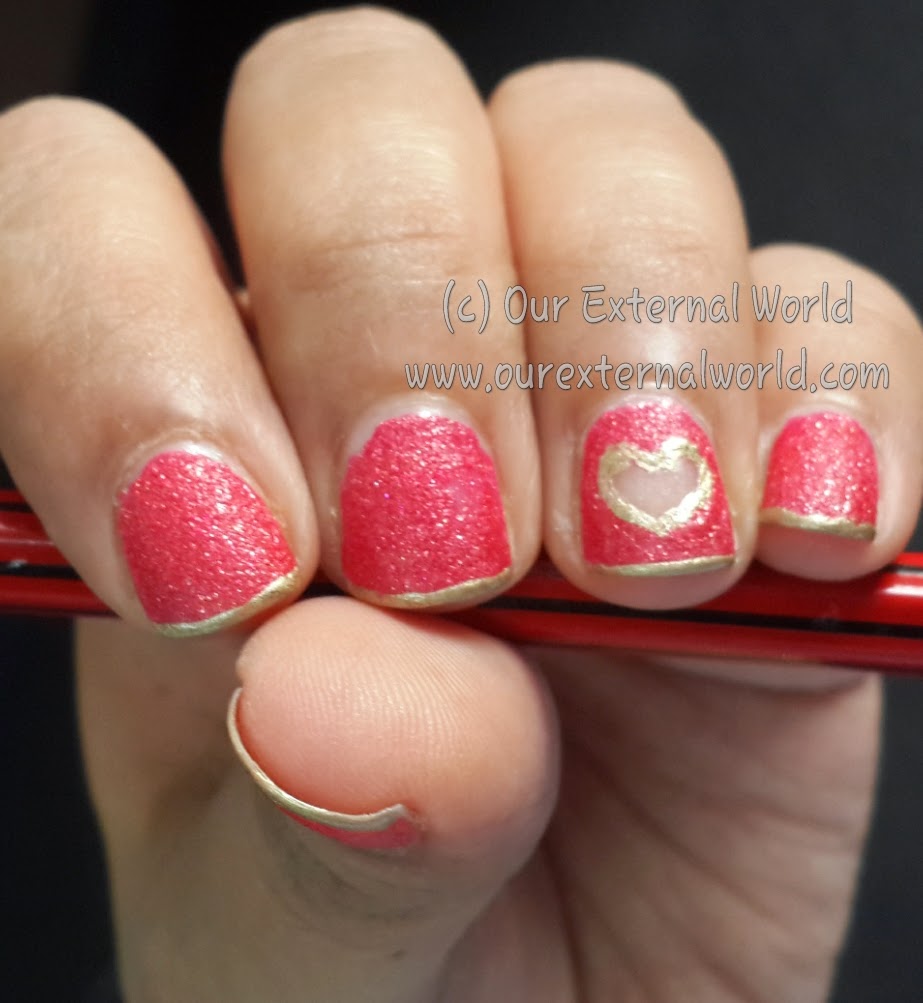
Cut Out Heart Nail Art Using Maybelline Glitter Mania Red Carpet - Tutorial

In the last post I shared swatches of the Maybelline Color Show Glitter Mania polish Red Carpet (HERE) and it had a sneak peak into a nail art I did using Red Carpet.

Here is the nail art I did - cut out heart nail art.

Cut Out Heart Nail Art Using Maybelline Glitter Mania Red Carpet - Tutorial

This is really easy to do. So here go the steps. First gather your polish - Red Carpet and Bold Gold both from Maybelline Color Show, scissors, tape/paper, top coat and base coat.

For the tutorial see the image below from top-left corner going in a clockwise direction.

  1. First step is to apply a base coat and let it completely dry.
  2. Use tape or a piece of paper to cut out a tiny little heart. Stick this on your accent nail. If you are using tape then make sure its not very sticky (use scotch tape if possible). I used paper and stuck the heart using a glue stick.
  3. Now use your polish and apply on the accent nail. Once it begins to dry gently lift off the heart using a pair of tweezers (or your nails if you have long nails). Don't worry if the heart is not very neatly drawn
  4. Apply polish to all other nails.
  5. Now use Maybelline Color Show Bold Gold and using a lining brush draw out the heart shape edge on the accent nail. Make sure to cover any glitches that you made in step 3.

Friday, July 11, 2014

Maybelline Color Show Glitter Mania Review and Swatches

I am sure by now all of you have heard all the craze about glitter polishes that has taken India (and the world) by storm after Maybelline launched their Glitter Mania range.

Maybelline Color Show Glitter Mania Review and Swatches

Glitter polishes are not something new but getting something for as low as Rs 125 is just super duper awesome! Maybelline Color Show Glitter Mania has a total of 8 shades. All polishes give a glittery sand textured effect. They are fast drying and long lasting.

I have two shades from the glitter mania range to show you here - Red Carpet and Starry Nights. Both the polishes (and others from the range) have fine glitter that gives them the sand textured effect. The glitter does not look glitzy but rather very glamorous.

Red carpet is a pink toned red polish with gold and red glitter - the glitter is extremely tiny. With a single coat this polish appears pinker but two coats give it a deeper reddish shade.

Thursday, April 24, 2014

Summer Nail Art - Mix-nMatch Nails With Tutorial

Hi friends, today I'm sharing another nail art in the Summer Nail Art series.

Mix-n-Match Nail Art

I couldn't share this earlier but I had actually done this for easter.  Well if you like it you can use it next year or simply do it to go with a nice summery outfit!

Summer Nail Art - Mix-nMatch Nails With Tutorial

The steps are very simple and you can follow the pictures.
Summer Nail Art - Mix-nMatch Nails With Tutorial

I have used Tangerine from Maybelline Color Show and acrylics to create these nails. After the above steps I just finished in by creating the outlines and filling in with green as you see in the final image.

Summer Nail Art - Mix-nMatch Nails With Tutorial
I hope you liked these. Don't forget to participate in the contest going on where you can win a lovely hamper from L'Oréal Paris India (check it out HERE).

Hope to be more regular with the posts soon, just too much happening outside my blogging life and tons of work. Nail art is becoming fun and I hope you all are enjoying learning these with me!

Sunday, April 20, 2014

Summer Nail Art - Sea Creatures - With Tutorial

I finally captured pictures at different steps of doing my free hand nail art as requested by a lot of you. I hope you like it! Today's nail art is another one part of the Summer Nail Art series and the topic is Sea Creatures.

Summer Nail Art - Sea Creatures - With Tutorial


Summer Nail Art - Sea Creatures - With Tutorial
First lets take a look at the base. I used Maybelline Color Show Blueberry Ice (403) as the base. Once it dried up I used the GQ Professional Nail Color in White and number 310 from Tenno Color. Both GQ and Tenno are local Delhi based nail polish brands (that is what the shopkeeper told me - have never heard or seen these before but I liked the quality and bought a few of these).

Friday, April 18, 2014

Summer Nails - A Day At The Beach

This time for the #stnchallenges the theme for Summer Nail Art is "A Day At The Beach". I have some fond memories of times I've spent at a beach and the ones I cherish the most are the ones from Maldives. The pristine beaches, the gorgeous blue sea, and the calm all around. And so my nail art was an attempt to reminisce those times.

Summer Nails - A Day At The Beach


I used Maybelline Color Show Cool Blue on the entire nail (just did one coat) and then used sponging technique using Cool Blue and Bold Gold (Maybelline Color Show) on all the nails.

HOW TO Summer Nails - A Day At The Beach
Summer Nails - A Day At The Beach
Then I used my MoYou London Stamping Plate Suki Collection 04, picked out random wave pattern type images and stamped using a local white polish mixed with a local deep blue polish. The polishes were mixed on the image itself so that the wave would get a random hint of blue when I swiped off the polish using the scraper. On the accent finger I have actually done dual stamping (two different patterns stamped over one another)

Thursday, January 2, 2014

MoYou London Suki Collection 04 Review & Stamping Nail Art

As you all know I have just forged into the world of stamping and was quite happy with my MoYou London plates (details HERE). Today I am reviewing the MoYou London stamping plate from the SUKI collection. It is number 04.
 
MoYou London Suki Collection 04 - Review
This plate has large designs approximately an inch wide and 1.5cm in height. The patterns are gorgeous. For my short nails only half the pattern can fit but if you have long nails you will simply love these.

I have stamped 5 different patterns from the SUKI collection 04 plate.

linkwithin